Toaster Oven Bread
Six simple ingredients and 90 minutes are all you need to make this tasty toaster oven bread. It’s tender inside, has a chewy crust, and is great for dunking in soup or sopping up sauces!

After the success of our small no-knead bread, we’ve been getting lots of requests for more beginner bread recipes. This new offering is adapted from a rapid-rise french bread recipe I found on the old website food.com.
The original recipe made 4 large loaves. So we did some downsizing and lots of test batches to come up with a version that makes just one small loaf of bread.
Texture-wise the bread is similar to the softer “French Bread” you’ll find at many U.S. grocery stores. If you’re looking for a baguette with a shattering thin crust, this recipe is not gonna cut it.
But if you’re in the mood for fresh bread that’s soft with a little chew, simple to customize, and perfectly sized for baking in a toaster oven – you are in the right place. Bonus: it’s great for making Toaster Oven Garlic Bread!

Recipe Ingredients
- Instant Yeast: Also known as rapid rise or bread machine yeast. This recipe uses half a packet (1⅛ teaspoon). If you plan on making bread often, buying yeast in a jar is way more cost-effective. Keep it in the fridge and the yeast will stay good for months.
- Flour: 3 tablespoons plus 1⅛ cups, divided. Basic all-purpose flour or bread flour both work great.
- Salt: ½ teaspoon
- Sugar: ½ teaspoon
- Olive Oil: ½ teaspoon
- Warm Water: ½ cup (115 to 120°F)
Beginner Kneading Tips
We don’t own a stand mixer so I’ve been learning to knead dough by hand and it hasn’t always gone well. If you struggle with kneading too, here are a few tips that might help.
Put on music. It’s easy to feel like you’ve been kneading forever when really only a few minutes have passed. Listening to music makes it more fun and after about two songs the dough will be smooth and springy.
It’s okay to stop and reset. If things go awry and you’ve got dough coating your hands and the board and maybe there’s even a little in your hair – take a few minutes to let the dough rest. Then come back and try again.
Watch other people knead. This video from King Arthur Baking shows how to use an easy fold-rock-and-roll technique. The kneading part starts around the 5:28 minute mark.
Okay, now that you’ve got your ingredients and are feeling super pumped about kneading…let’s bake some toaster oven bread!
Step-by-Step Instructions
Start By Making The Dough
1. Measure 3 tablespoons of the flour into a small bowl and set it to the side. In a medium bowl, whisk together the remaining 1⅛ cups of flour, 1⅛ teaspoons yeast, ½ teaspoon sugar, and ½ teaspoon salt. Pour the ½ cup water and ½ teaspoon oil into the bowl with the flour and mix to combine.

2. The dough will be really sticky at this point. Mix in some of the flour that you set aside earlier, a tablespoon at a time, until a soft shaggy dough forms. We usually only need an extra tablespoon to bring everything together. But it’s okay if you need a little more.
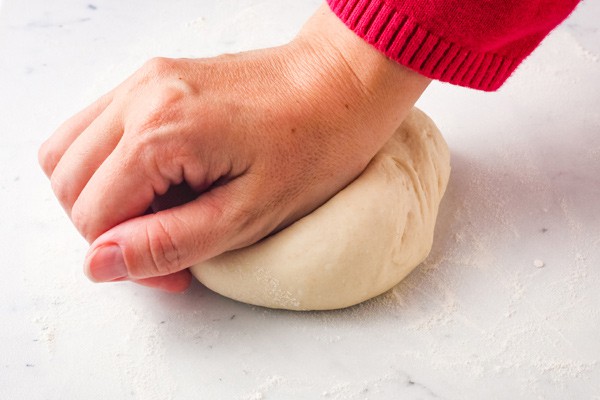
3. Lightly dust a cutting board and your hands with flour. Add the dough and knead until it’s smooth and elastic (about 6 to 8 minutes). Sprinkle more of the reserved flour onto the board, as needed to keep the dough from sticking while you knead.

Quick Tip: If you find the board is sliding around a lot, dampen a paper towel and squeeze it out well, then spread it out flat and top with the board. For a no-waste solution, I like to use our 9″x12″ silicone trivet (one of my favorite toaster oven accessories). The silicone grabs the board and holds it in place.

Now, Let The Dough Rest
To relax the gluten and make the dough easier to shape in the next step you’ll want to let it rest for a bit.
1. Grab the mixing bowl you used earlier (yeah, I know the bowl’s dirty, it’s alright) and add the dough.
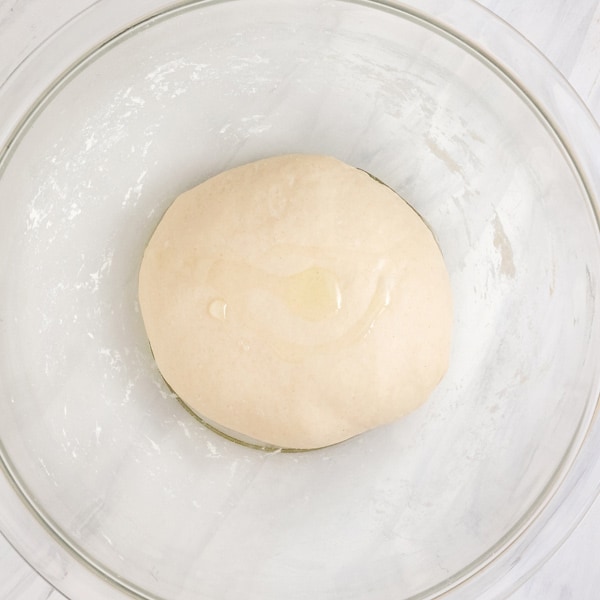
2. Pour a little oil over the dough. Rub the oil around the dough then flip it over and rub the other side too making sure the entire ball is coated with oil.
3. Cover the bowl (I usually just pop the cutting board on top) and let the dough rest for about 10 minutes.
Shape and Rise
Before you start fussing with the dough, set aside a flour sack towel or plastic wrap if you don’t have any lint-free towels. Then, grab a small-ish sheet pan (if your oven is larger, a quarter sheet pan works well) and line it with a silicone baking mat or lightly rub it with oil.

Now that the dough has rested it’s time to shape it. While we usually make a single loaf, the dough can also be shaped into 5 individual rolls or 2 mini loaves (like the ones we used for these veggie subs). They all take about the same amount of time to bake.
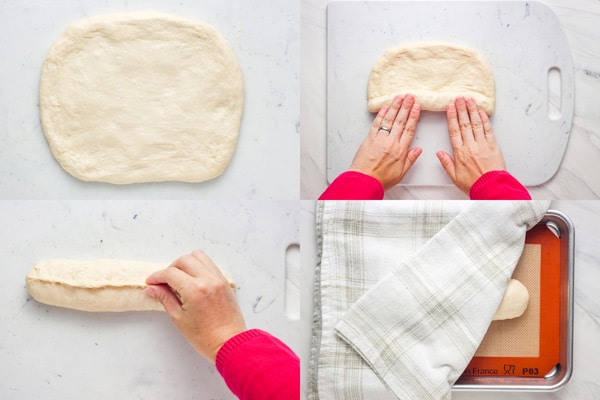
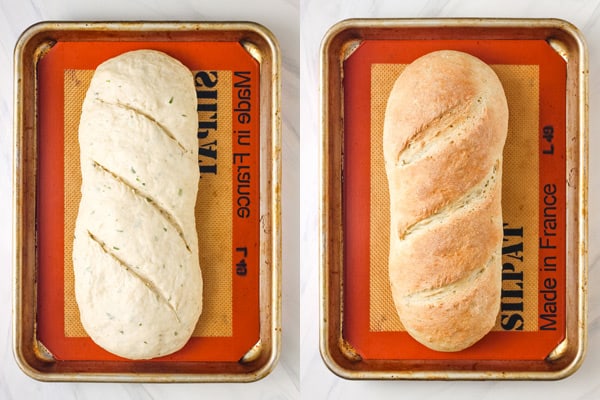
Here’s how to shape a single loaf:
- Transfer the dough to a lightly floured cutting board and press it into a rectangle that’s about 6 to 7 inches long by 5 to 6 inches wide.
- Starting with the long side, roll the dough away from you into the shape of a log.
- Turn the sides in and tightly pinch the seams closed.
- Place the shaped dough onto the pan with the seam side facing down. Cover with a slightly damp flour sack towel or a piece of lightly oiled plastic wrap.
Let the dough rise until it’s almost doubled in size, about 25 to 30 minutes or more depending on how cold your room is.

Bake The Bread
1. About 5 minutes before the bread has fully risen, start preheating the toaster oven. Adjust the toaster oven’s cooking rack to the bottom position, select the BAKE setting and heat to 400°F.
Convection Baking: We love to use the convection fan to bake this bread because the bread rises taller and has a better crust. If you’re cooking with a convection toaster oven, keep the temperature the same but check on the bread early.
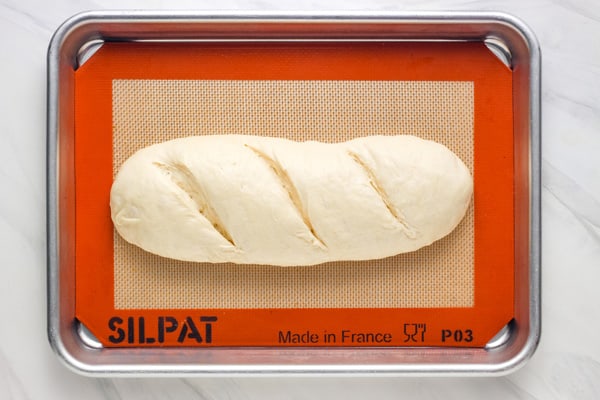
2. With a sharp knife, clean razor, or a lame, make 3 diagonal slashes across the top of the loaf. These relief cuts are to keep the bread from blowing out in other parts (like near the seam) when it’s expanding in the oven.
3. To help the crust brown and crisp up, we like to spray the dough lightly with water before baking. I have a clean spray bottle that’s just for bread but you can also gently brush the loaf with water instead.
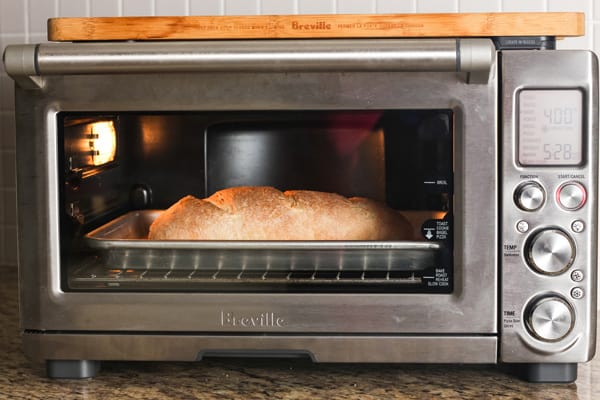
4. Add the dough to the heated toaster oven and bake for 10 minutes. Then carefully rotate the pan. Continue baking until the bread is golden brown, sounds hollow when you tap the bottom and has an internal temperature of 200-210°F, about 10 to 15 minutes more.
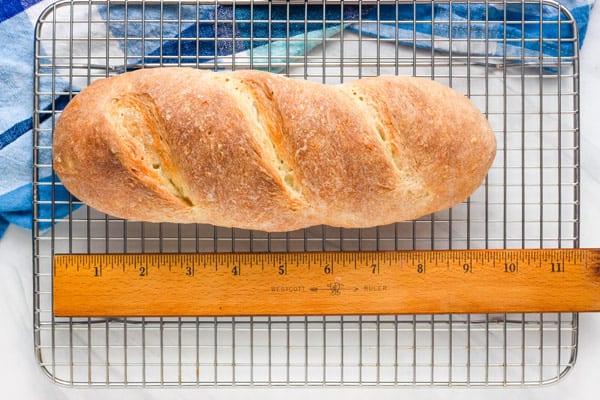
5. Once you’ve got your beautiful loaf, transfer it to a wire rack and let the bread cool completely (or for as long as you can stand waiting) before tearing into it!
Toaster Oven Baking Tips
Fully Preheat The Toaster Oven: Most toaster ovens are designed to signal as ready prior to actually reaching the desired temperature. Preheat the oven for at least 5 to 6 minutes or use an oven thermometer to check the temperature and make sure it has reached 400°F before adding the dough.
Some Ovens Will Brown The Crust More: In our smaller oven the crust was developed and cooked through but it wasn’t browned as much. For a shinier golden brown crust, you can skip the water and try an egg wash instead. Whisk an egg white with 1 tablespoon of water until foamy and then gently brush it over the dough before baking it. (*I did not use a wash for any of the loaves pictured).

Frequently Asked Questions
How long does the bread last?
You’ll want to eat it within a day or two. After that, the bread gets dried out and hard. While not great for snacking on, stale bread is ideal for making crostini and croutons.
Do I have to bake it in a toaster oven?
Nope. This small loaf of bread can also be baked in a traditional “big” oven. Use the middle rack position and check on the bread after 15 minutes, adding more time as needed. All of the larger-oven loaves we made took about 20 minutes.

Can you omit the sugar?
Yes, but the dough will take longer to double in size (our loaf took 45 minutes), might not brown as much, and it will definitely not be as flavorful. The sugar-free loaf we made was very similar in texture to the original bread but it tasted super bland. If we made it again, I would add garlic powder and herbs to give the bread some dimension.
Got any fun flavor ideas?
For an easy flavor boost, we like to add 1 to 1½ tablespoons of chopped fresh herbs (like rosemary and thyme) to the flour. We haven’t done much experimenting yet but on our to-try list is kneading in sun-dried tomatoes, minced garlic, and shredded cheese.
Can you double the recipe?
Yes! We doubled the ingredients and were still able to fit the shaped loaf onto the quarter sheet pan. It took a few minutes longer to bake but turned out great.
More Toaster Oven Baking Recipes
- Toaster Oven Banana Bread
- Toaster Oven Biscuits for Two
- Easy Mini Soda Bread
- Toaster Oven Chocolate Chip Cookies
- Mini Applesauce Spice Cake
- Toaster Oven Blueberry Muffins
- Toaster Oven Chocolate Cookies
- Mini Banana Bread For Two

Toaster Oven Bread
This bread is best baked in a medium or large toaster oven that can accommodate a 10 or 11-inch long pan and has enough head space for the bread to rise.
Ingredients
- 3 tablespoons (23 grams) plus 1⅛ cups (142 grams), divided, All-Purpose Flour or Bread Flour
- 1⅛ teaspoons Instant or Rapid Rise Yeast (half a package)
- ½ teaspoon Granulated Sugar
- ½ teaspoon Fine Sea Salt or Table Salt
- ½ cup (4 fl.oz / 114 ml) Warm Water (115-120°F)
- ½ teaspoon Olive Oil, plus more for the bowl
Instructions
Make The Dough
- Measure 3 tablespoons of flour into a small bowl and set aside.
- Place the remaining 1⅛ cups of flour into a medium bowl. Add the yeast, sugar, and salt and whisk to combine. Stir the water and oil into the bowl with the flour. Mix in some of the reserved flour, a tablespoon at a time, until a soft shaggy dough forms. *You shouldn’t need all of the extra flour.
- Lightly dust a cutting board and your hands with flour and knead the dough until smooth and elastic (about 6 to 8 minutes). To test if the dough has been kneaded enough, press it with your finger. If the spot you pressed quickly springs back and fills in, it’s ready.
Let The Dough Rest
- Add the dough to the mixing bowl used earlier, and drizzle with oil. Rub both sides of the dough to make sure the entire ball is coated with oil. Cover the bowl and let the dough rest for 10 to 15 minutes.
Shape and Rise
- Line a small sheet pan with a silicone baking mat or lightly oil and set aside.
- Once the dough has rested, transfer it to a lightly floured cutting board and press or roll into a rectangle about 6 to 7 inches long by 5 to 6 inches wide.
- Beginning with the long side, roll the dough away from you into the shape of a log. Fold the sides in and tightly pinch the seams closed.
- Place the dough seam side down on the prepared pan and cover with a slightly damp tea towel or lightly oiled plastic wrap. Let rise until almost doubled in size, about 25 to 30 minutes or more depending on the temperature in your home.
Bake The Bread
- Adjust the toaster oven’s cooking rack to the bottom position, select the BAKE setting, and preheat to 400°F.
- Using a sharp knife or a clean razor blade, make 3 diagonal slashes across the top of the loaf.
- Fill a clean spray bottle with water and lightly spray the exterior of the bread. If you don’t have a spray bottle, gently brush the loaf with water or sprinkle the water over the loaf. Then add the bread to the warm oven.
- After ten minutes, carefully rotate the pan. Continue baking until the bread is golden brown, sounds hollow when you tap the bottom and has an internal temperature of 200-210°F, about 10 to 15 minutes more.
- Transfer to a wire rack and let the bread cool completely before tearing into it!
Notes
Convection Toaster Oven: Keep the temperature the same but check on the bread early. If you find the bread is browning too fast, reduce the temperature to 375°F.
Bread Size: The size of the final loaf will depend on how it is shaped and rises but most of our loaves have weighed about 8.5 ounces and been 8 to 9 inches long x 3 inches wide x 2½ inches tall.
Nutrition: Is per slice, assuming 6 slices about 1½ -inch thick.
Recipe adapted from food.com.
Nutrition Information:
Yield: 6 Serving Size: 1 sliceAmount Per Serving: Calories: 105Total Fat: 0.7gSaturated Fat: 0.1gCholesterol: 0mgSodium: 40 mgCarbohydrates: 21.3gFiber: 0.7gSugar: 0.4gProtein: 2.8g
I love this simple recipe! I’ve successfully made bread 4 times now. Last night was the first time I deviated from the recipe. And it turned out beautiful! First I doubled the recipe. Then added garlic, parsley, tiny bit of red pepper seasoning. (All the ad-ins were just guessing on measurements. ) I have learned by working with dough, it comes down to a balance of dry vs wet ingredients. I just kept adding tiny bits of flour or sprinkling of oil til it felt right.
For me, I heated toaster oven, turned it off, put dough in to rise with door cracked a lil bit. I keep my house on the chilly side. I did this twice to achieve desired rise.
I just wanted to pop on here and let you know, thank you for this recipe! My fiance thanks you too! 🤪👍🙂
That’s so awesome to hear, Katrina! Thank you for taking the time to leave a comment. Your dough rising trick using the toaster oven is genius, and I bet a lot of people will appreciate reading about it!
Thanks again and Happy Baking!
~ Brie
Wondering how cheese would be inside this.
this recipe was whack because it doesn’t inform you how much water, oil, salt and sugar to add. It simply says mix it all together I read over the recipe three times and never mentions the amount …had to use someone else’s recipe after so got half way. get it together
Hi Nicholle, it sounds like you had some trouble finding the recipe card.
It’s located above the comment section, where you left this comment. The recipe card includes all of the measurements and complete steps.
To help our readers, we’ve provided tips and photos for making, shaping, and baking the bread in this post. Our readers don’t generally cook from the photos; instead, they use that section to get an overview of the recipe and refer to it if they have a question about something.
Similar to a cookbook, the recipe card is where you will always find the exact measurements and steps. It can be printed or saved.
If you’re not interested in the photos and tips, you can also go straight to the recipe card on every page by clicking the “View Recipe” link under the title at the top of that page.
In an effort to make the page more useful to those who might like to cook from the step photos (which I think is what you were trying to say) I have added the measurements.
Hey dear, if you continue scrolling, or, go back to top and click “view recipe” it will take you straight to the recipe for the amount of everything to use. Just fyi. 🙂
hello! i would like to ask if i can swap out olive oil for another type of oil because it’s really expensive where i live 😿 does canola vegetable oil work? thank you!
Hi Sophia,
Yes, swapping the olive oil for canola or vegetable oil is okay and shouldn’t affect the bread. 🙂
Happy Baking!
~ Brie
Can this be done with traditional yeast? That’s the only kind I have.
Thanks,
Sandra
Hi Sandra Joy,
If you’re asking about active dry yeast check out my response to Eden below.
Here are the highlights:
Hope that helps!
~ Brie
Thanks for caring to share the bread recipe. I tried it and it turned out great. I have a tiny toaster oven so I needed a tiny loaf of bread or it would come out black on top coming close to the element. I even tried a little weird recipe with the last end piece, and some eggs and sour cream in the microwave. Moowah.
Yay, I’m so glad to hear it worked out well for you, Sarah! Thank you for taking the time to leave a comment and letting us know. And oh boy, does that egg dish sound super rich and decadent – what a treat 🙂
I only have active dry yeast. Should I activate with 142 grams of flour and warm water and let sit for 45 minutes then resume with the recipe of adding the sugar and salt?
Hi Eden,
We’ve made this recipe a few times using active dry yeast, here’s how we do it.
For active dry yeast, warm the water to between 105F and 110F.
Stir the yeast and sugar into the water (instead of the flour). Let the mixture sit for 5 to 10 minutes. The yeast should bubble and foam up a lot.
In a medium bowl, mix together 1⅛ cups of flour and the salt, stir in the bloomed yeast/water/sugar mixture and the oil, and then proceed with the recipe.
I let the dough rest a little longer, for at least 25 minutes but 30 to 35 minutes is even better if you’ve got the time. Then I gently press it down, shape it, and add it to the pan.
For us, the shaped dough usually takes about 40 to 45 minutes to double in size but it really depends on how warm the house is.
Hope that helps and if you have any questions feel free to leave another comment or email 🙂
Happy Baking!
~ Brie
Can you use Stevia instead of the sugar? I’m a Diabetic.
Hi Adora,
I’ve never baked with Stevia before and don’t really know anything about how it works in a recipe.
Traditional french bread doesn’t have sugar but this is a “cheater” recipe that uses a combination of extra yeast and a tiny amount of sugar to speed things up.
After seeing your comment, I was curious about what would happen if we omitted the sugar. So we made a loaf and left the sugar out.
You can see a photo of the results under the FAQ section. The dough needed a little longer to double in size and the crust didn’t get as browned.
The crust and interior texture were the same but the bread had zero flavor. Adding stevia might change that but I couldn’t say for sure.
If you aren’t in a rush, our small no knead bread recipe could be a better option. The long fermentation time allows the bread to develop a really nice flavor without any added sugar. You can find that recipe here: https://toasterovenlove.com/small-no-knead-bread/
Also, in a few weeks, we’ll be posting a small soda bread recipe that does not include sugar in the main recipe. If you’re signed up for our newsletter, you’ll be notified when it’s ready.
Hope this info helps and happy baking!
~ Brie
I made this small loaf today. It was not as “fluffy” looking as your photo; however, the taste , crust and chew are good. I was given some sourdough starter. Can it be used in this recipe, and how much starter to add? Thank you for your recipes.
Hi Mabell,
Because of the shorter rise time, this bread is on the denser side but it sounds like you’re loaf was much denser than expected.
I’m still a newbie baker and no expert but one of the following things may have happened:
There was too much flour – A scale is the most accurate way to measure. If measuring with cups it’s best to use the spoon and sweep method of gently spooning the flour into the measuring cup and then leveling the cup with the back of a spoon.
The dough wasn’t kneaded enough – To test the dough, poke it with a floured finger. If the hole fills back in quickly it’s ready. This post has some good tips to tell if the dough has been kneaded enough https://www.thekitchn.com/bread-baking-tip-how-to-tell-w-156772.
The dough didn’t prove long enough – The room’s temperature can make a difference here. If it’s very cold the dough will take a little longer to double in size.
The bread was not cooled before cutting – slicing into a hot loaf of bread can trap steam/moisture in the bread making it denser. If the bread has a damp texture this is usually the culprit. I have done this more times than I care to admit.
I’m sorry, Mabell, but I have zero experience baking sourdough so nothing to offer in that department. Perhaps the person who gave it to you might be able to advise you on this?
Thanks for trying the recipe and taking the time to leave a comment 🙂
Happy Baking!
~ Brie
Hello! Loving the toaster oven recipes!! Here in the South, we wait until a small amount of time in the year to be able to use the over for anything more than using the cooktop, but I wonder, if I have a Ninja table-top “oven” (Ninja DT201 Foodi 10-in-1 XL Pro Air Fry Digital Countertop Convection Toaster Oven), do I have to adjust any of the settings or steps?
Hi Maureen!
I think this recipe should work pretty well in the Ninja XL. I actually made a loaf in their Foodi Dual Heat Oven and it turned out good so I imagine the larger oven would work even better.
The only thing to watch out for with those ovens is the preheat, it’s too short for baking bread.
You’ll want to ignore the preheat beep and wait for at least 5 to 8 minutes longer for it to heat up. Or if you have an oven thermometer available, pop it in and wait for the thermometer to reach 400F before you add the shaped loaf.