Small No Knead Bread
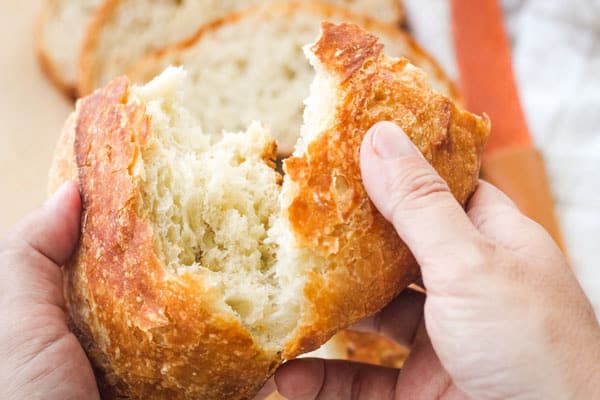
Crusty on the outside, soft and flavorful inside, this small no knead bread is perfect for feeding one or two people. Great for beginner bakers, the scaled-down recipe requires just a few ingredients and no special skills.
If you’ve ever wanted to bake fresh bread at home but felt intimidated, then today’s recipe is for you!
Why is no knead bread so perfect for beginners?
It’s super easy, almost impossible to screw up, and tastes fantastic. As a newbie bread baker myself, it’s my favorite recipe to make.
The only problem is that most recipes create more bread than any small household needs. Plus they call for a 5 or 6-quart Dutch oven which is crazy heavy and would never fit in our toaster oven.
So we took the best parts of our favorite large recipes (like the famous one from Jim Lahey of Sullivan Street Bakery and this scalable recipe from Le Creuset that adds vinegar and skips preheating the dutch oven!) and combined them for a small batch version that’s just as crusty, chewy, and delicious.
How Long Does it Take to Make?
The secret to this recipe is time. A lot of it. In total, the bread takes about 15 to 22 hours to make.
Wait, did I just lose you? Come back! While this is definitely not a quick recipe, most of the time is hands-off.
Here’s a little rundown of how the timing works out:
- Mixing the Dough – 10 minutes
- 1st Rise / Fermentation – 12 to 18 hours
- Prepping Pan and Shaping Dough – 10 minutes
- 2nd Rise – 1 hour (longer if it’s cold)
- Baking – 45 to 50 minutes
- Cooling – 1 hour
The bolded items are the only time where you have to actually be present/paying attention. So just a little over 1 hour!
In our house, we call this Weekend Bread. I mix up the dough on a Friday evening and let it rise overnight.
Saturday morning I shape it, let the dough rise again, and then I pop it in our countertop oven to bake. By lunchtime the bread’s cooled and ready to be devoured.
If you’re looking for a quicker bread option, try our mini soda bread that’s made without yeast. Or this toaster oven bread recipe. It makes a cute little loaf of bread in under 90 minutes!
Ingredients List
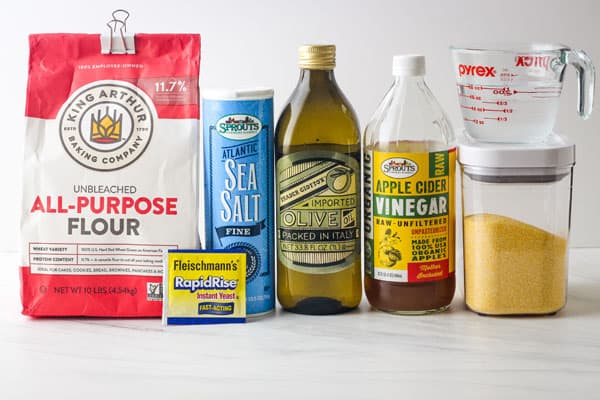
Here’s what you’ll need to make this small loaf of bread:
- Flour: All-Purpose flour works great. You’ll get a bit more structure and a chewier texture with bread flour but you don’t have to run out and buy it.
- Yeast: Instant or Rapid Rise. We use the little blue packets from Fleischmann’s.
- Salt: Table salt works fine, sea salt is another good option.
- Water: Cool or at room temperature.
- Apple Cider Vinegar: This gives the bread a little tangy flavor.
- Oil: To keep the dough from sticking to the bottom of the pot.
- Cornmeal: Extra insurance your bread won’t stick, plus it adds a tiny crunch and artisan-style feel to the bread.
You’ll also need a large mixing bowl plus something to cover it with, a rubber spatula, a cooling rack, and a 2 to 3-quart Dutch oven (that’s oven safe to at least 425°F).
Smaller Dutch Oven Options
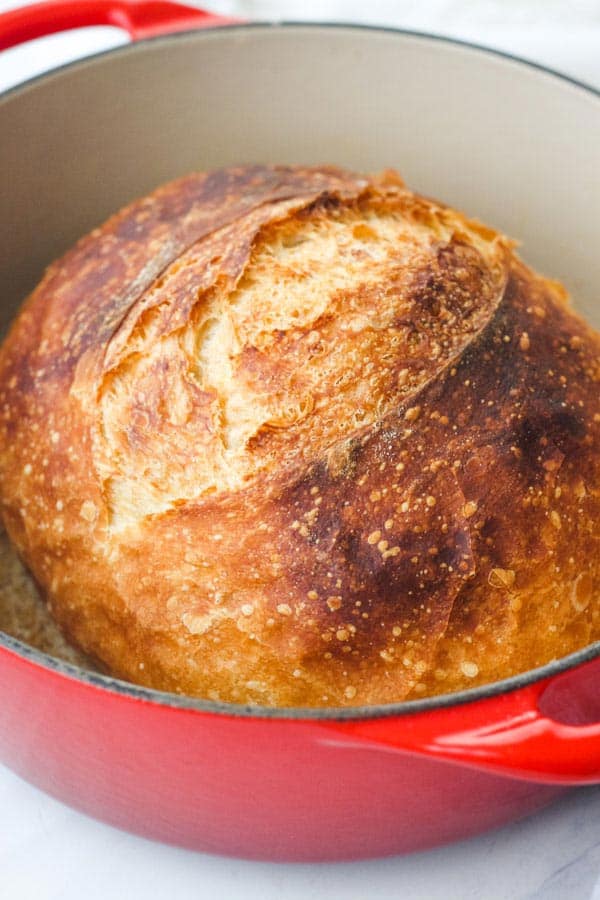
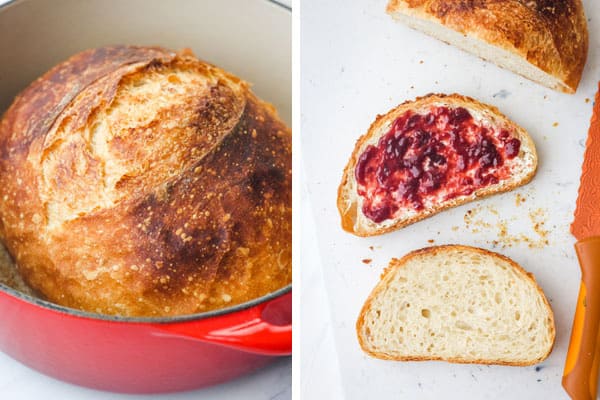
We own two small enamel-coated dutch ovens. A 2-quart one made by Martha Stewart and a 2 ¾-quart shallow dutch oven made by Le Creuset. I’ve baked this recipe in both of them with great results.
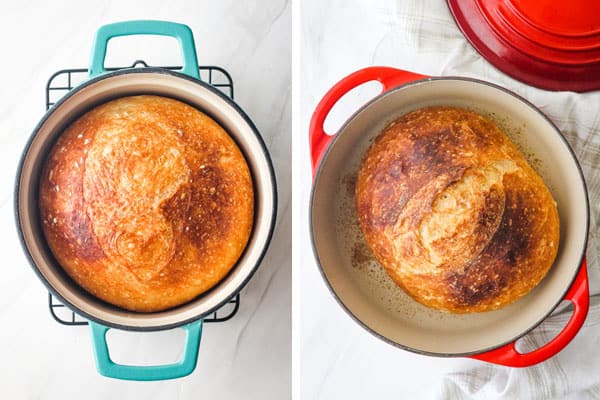
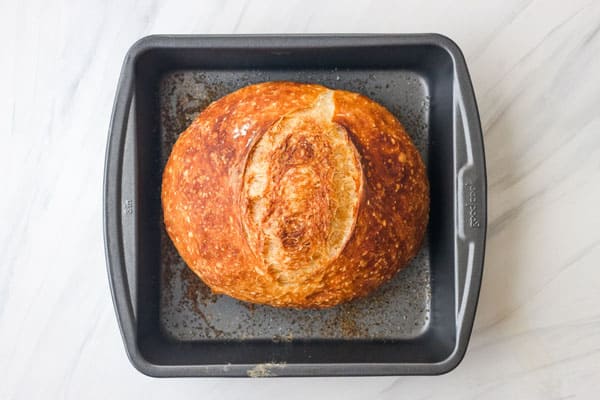
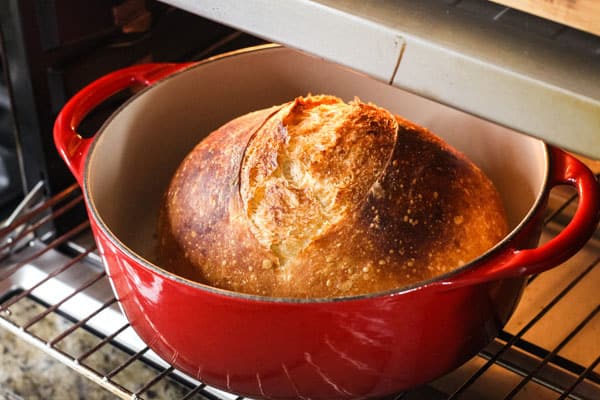
A 2-quart Dutch oven is the smallest size you can use for this recipe. I don’t know if you can see it in the picture but the bread filled the entire pot and came all the way to the top.
A slightly larger Dutch oven (like a 2 ¾ or 3-quart one) will give the bread room to expand and result in a more rustic-style loaf.
If you don’t have a dutch oven you can try something like this DIY one we made using two metal 8 x 8 pans and some metal clips.
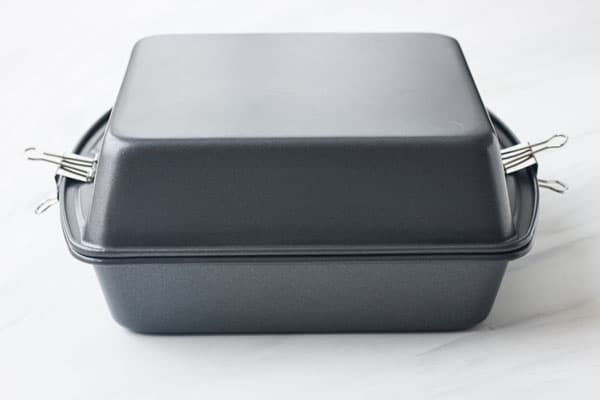
I got the idea from a site called No-Knead Bread Central which has lots of helpful videos and even a few toaster oven bread recipes!
The bread rose a little less and had a slightly different crust but overall it tasted yummy.
Beginner Tips From a Beginner
Lastly, here are a few of the things I wish someone had told me before I made my first no knead bread:
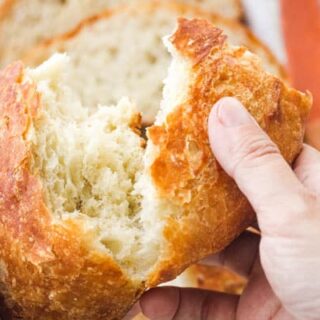
- Don’t aim for perfection. I’ve made this bread at least 30 times now and it’s never been “perfect” (sometimes it looks more like a football or the crust gets over-browned) but it always tastes delicious. Especially when it’s slathered with raspberry jam, dunked in pea soup, or used in a toaster oven grilled cheese sandwich!
- Learning something new takes time. The more you get used to the process the easier it will be. Eventually, you’ll barely even need a recipe.
- It helps if you can see what things should look like at each step. So we’ve included step-by-step photos after the recipe card. Take a minute and check them out before you get started.
Happy Baking!
Small No Knead Bread
Everything you want in a homemade bread (crusty outside, soft and chewy inside) without lots of kneading or a bunch of leftovers. The key to this easy small batch recipe is a long fermentation/rising time, so you’ll need to start the dough about 24 hours before you plan to eat it.
Ingredients
For The Dough:
- 2 cups (266 grams) Unbleached All-Purpose Flour or Bread Flour
- 3/4 teaspoon Table Salt or Sea Salt
- 1/4 teaspoon Instant Dry Yeast (Rapid Rise)
- 3/4 cup plus 2 tablespoons (200 grams) Water, cool or at room temperature
- 1/2 teaspoon Apple Cider Vinegar (optional)
For Baking:
- 1/2 teaspoon Oil (Olive Oil, Avocado Oil, or Canola Oil)
- Cornmeal
Instructions
- In a large bowl, mix together the flour, salt, and yeast. Add the water and vinegar. Using a rubber spatula stir and fold the mixture until a shaggy dough ball forms. You want the dough sticky, if it’s too dry or there’s still flour in the bottom of the bowl you can stir in an extra teaspoon or two of water.
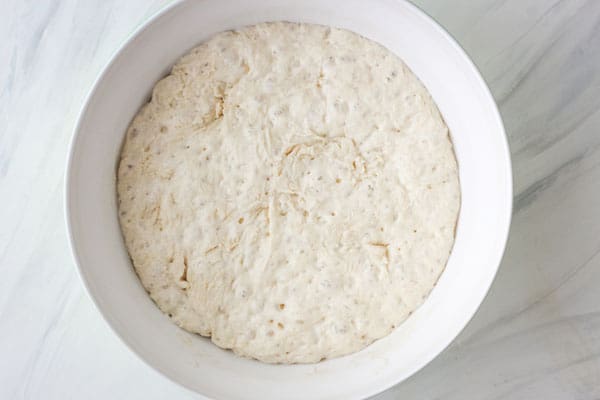
- Cover the bowl with a lid, plastic wrap, or a large plate. Let rise for 12 to 18 hours at room temperature and out of direct sunlight until the dough is more than doubled in size and the surface is dotted with lots of air bubbles.
- Once the dough has risen, rub the bottom of a 2 to 3-quart dutch oven with oil and dust with cornmeal.
- Using a rubber spatula or bowl scraper, scrape the sticky dough out of the bowl and onto a well-floured surface. Gently fold it a few times, then pull all of the edges towards the middle, flip the dough over, and shape it into a tight ball.
- Place the dough in the center of the pot, seam side down, and cover with the pot lid. Let rise at room temperature until the dough has almost doubled in size and slowly springs back when poked with a finger, about 1 to 2 hours.
- When ready to bake, adjust the oven rack to the middle position and preheat to 425°F. If using a large toaster oven instead, adjust the rack to the bottom placement and select the BAKE setting.
- Make a 4-inch slit about 1/2-inch deep across the top of the bread using a knife or razor blade. Cover the pot with the lid and place in the oven. Bake for 30 minutes, then carefully remove the lid and reduce the oven temperature to 400°F. Continue baking until the crust is nicely browned about 15 to 20 minutes longer. The bread should have an internal temperature of 200°F to 210°F and sound hollow when you tap on the bottom of it.
- Using oven mitts, carefully remove the bread and transfer to a rack. Let cool for at least an 1 hour before slicing and serving.
Notes
Recipe yields one small loaf of bread weighing about 14-ounces.
Storage Tips
The bread tastes best the day you bake it and should be eaten within 2 days of baking. On the first day, we usually leave the loaf out with the cut side facing down on a cutting board. It can also be stored in a paper bag on the counter. After that, it will be pretty stale and hard. If your bread ends up stale, you can use it to make a batch of toaster oven croutons.
The bread can also be wrapped and frozen. I’d recommend slicing it before freezing, that way you can just remove one or two pieces and let them thaw at room temperature.
Nutrition Information:
Yield: 6 Serving Size: 1 SliceAmount Per Serving: Calories: 160Total Fat: 0.4gSaturated Fat: 0.1gCholesterol: 0mgSodium: 235mgCarbohydrates: 31.3gFiber: 1.1gSugar: 0gProtein: 5.7g
How to Make a Small Loaf of No Knead Bread
Step 1: Mix The Dough
Start by combining the flour, salt, and yeast in a large bowl. I like to use a kitchen scale to measure out the flour. It’s more accurate and also means fewer dishes to wash.
If you’re using measuring cups, just spoon your flour into the cup and then level it off with the back of a knife.
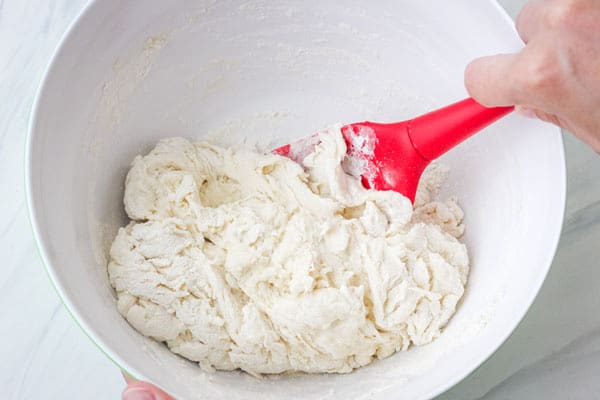
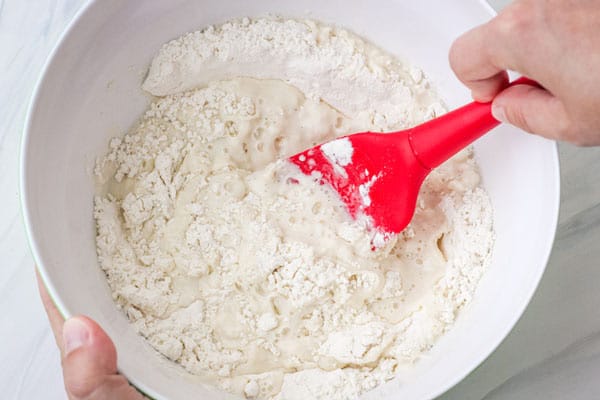
Next, pour the water and vinegar into the bowl. Use a rubber spatula to stir and fold the dough until it’s sticky and shaggy (not smooth).
There should be no flour left in the bottom of the bowl. If the dough feels dry you can stir in an extra teaspoon or two of water.
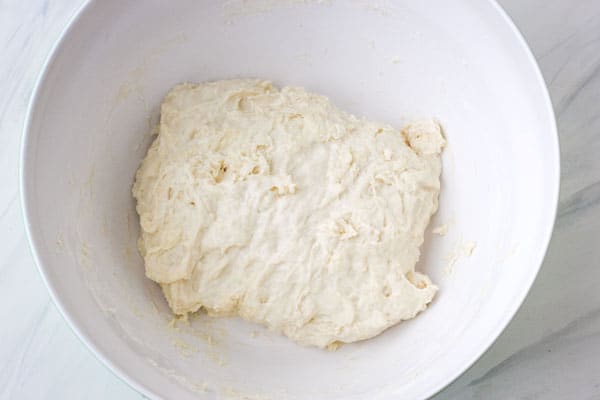
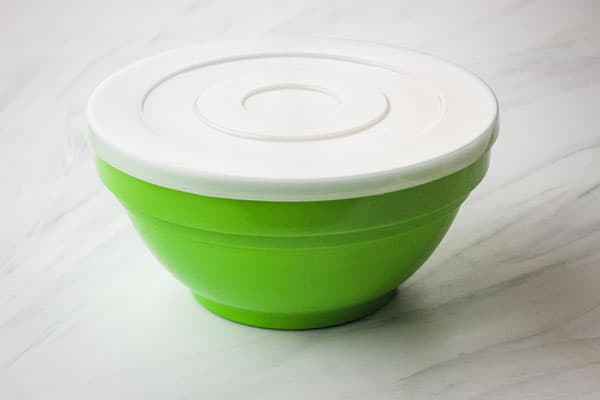
Step 2: Cover and Let Rise
Cover the bowl with a lid, plate, a piece of plastic wrap, or even an unused shower cap.
Place it in an out-of-the-way area, that’s warmish (around 72 degrees) but not in direct sunlight.
Let the dough rise at room temperature, for a minimum of 12 hours and up to 18 hours maximum. This long fermentation is what gives the bread structure and a richer flavor.
So the longer the dough rises the better it will taste but you’ve also got to do what’s practical for your schedule. For us, 12 to 14 hours works pretty well.
Step 3: Shape and Rise Again
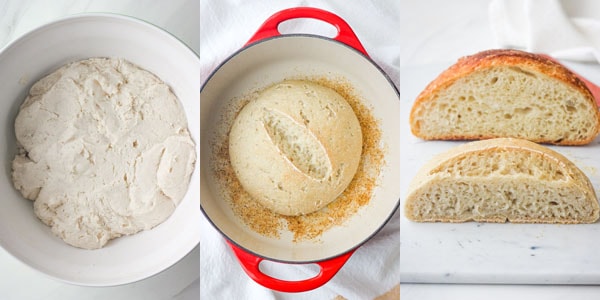
After fermenting, the dough will have magically transformed from a shaggy mess into a sticky dough blob dotted with lots of air bubbles.
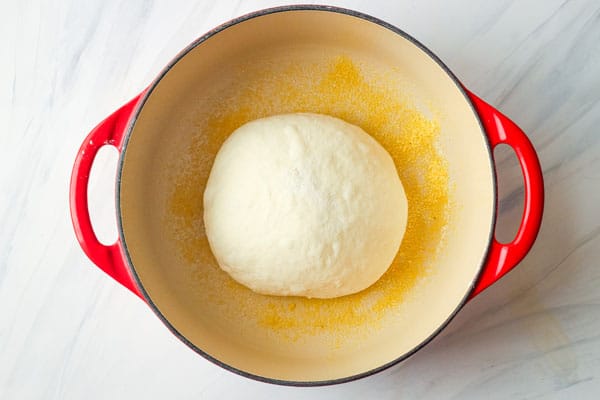
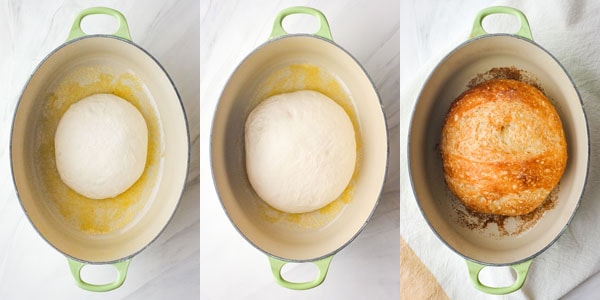
But before you start grabbing on it you’ll want to prepare the Dutch oven. Pour a tiny bit of oil (about 1/2 teaspoon) into the pot and rub it around the bottom. If you’re using a 2-quart dutch oven I find it helps to keep the bread from sticking if you rub the oil up the sides too.
Then lightly dust the bottom with cornmeal.
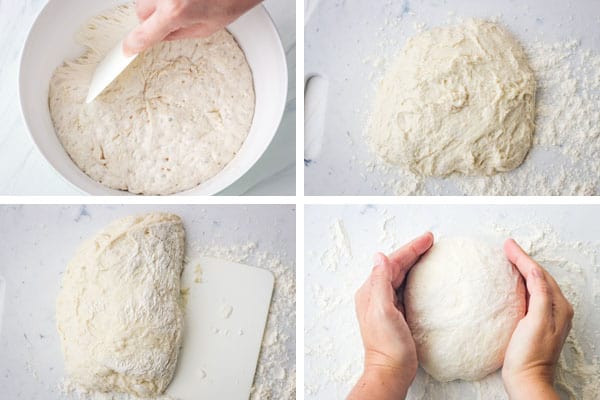
Once you’ve got your pot ready, use a rubber spatula or a bowl scraper to scrape the sticky dough onto a well-floured surface.
Gently fold the dough over itself a few times, then pull all of the dough edges towards the center and turn it over. Cup your hands around the dough and quickly shape it into a tight ball.
Place the dough (seam side down) in the center of the prepared pot and cover with the lid. Let it rise at room temperature until the dough has almost doubled in size, about 1 to 2 hours.
To see if it’s ready for baking gently poke the dough with a lightly floured finger.
- If the bread springs back immediately and fills in the space it needs more time.
- If the dough slowly springs back and mostly holds the impression – you’re ready to preheat the oven.
Step 4: Bake and Cool
If you’re cooking with a traditional oven, adjust the rack to the middle position and preheat to 425°F.
Most days (and especially during the summer) we like to bake in our countertop oven to avoid heating up the whole house. For this recipe, I keep the temperature the same but use the bottom rack placement as that’s the only way I can get our Dutch oven to fit.
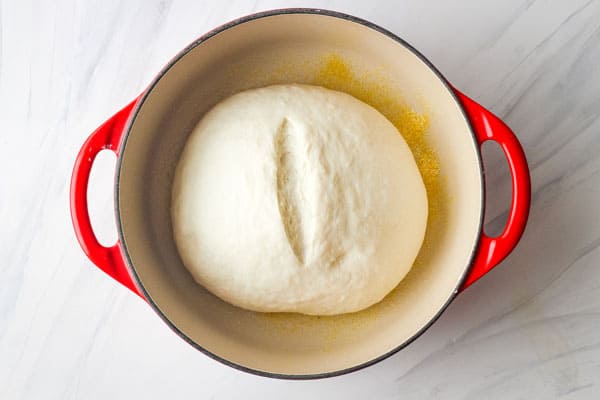
Once your oven of choice is fully preheated use a knife or razor to slash/score the bread across the center. Then cover the pot and place it in the oven.
Bake for 30 minutes. And no peeking! You don’t want to let out any of the steam that’s trapped in the pot.
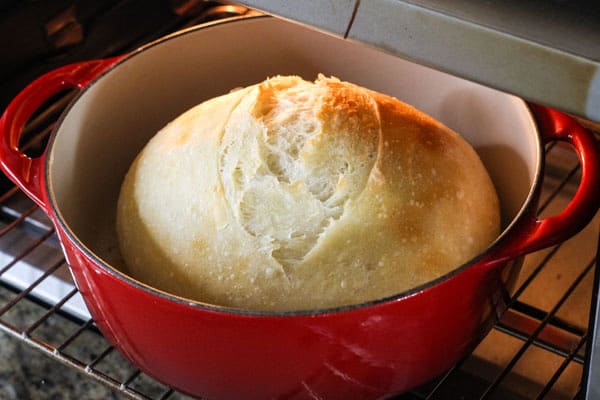
After 30 minutes, reduce the temperature to 400°F and carefully remove the lid from the pot. Continue baking the bread until the crust is nicely browned, about 15 to 20 minutes longer.
Toaster Oven Tip
In a countertop oven or toaster oven, the heating elements will be close to the top of the bread. If you see the bread is over-browning after you remove the lid, it’s okay to lower the temperature even more.
This is especially important for bread cooked in a DIY dutch oven (using metal pans). As it will already have some browning on the crust when you remove the top pan.
When ready, the bread should have an internal temperature of 200°F to 210°F and sound hollow when you tap on the bottom of it.
Using oven mitts, carefully transfer the bread to a rack and let it cool for at least 1 hour before slicing and devouring.
Recipe FAQs
Can you bake this recipe in a larger dutch oven?
Yes! We tried it in an oval 6-quart Dutch oven, the little loaf spread about the same and baked up great without any changes needed to the baking temperature or time.
Would gluten-free flour work in this recipe?
No. We made the recipe above using Bob’s Red Mill 1 for 1 Gluten-Free Baking Flour and the results were not good.
The dough looked like spackling paste, and once baked it was squat, heavy, and dense with a wet and doughy interior. You can see in the last photo above how little it rose in comparison to the original recipe.
Can you use active dry yeast instead of instant yeast?
Yes! An equal amount of active dry yeast can be substituted for the instant yeast. Just mix it in with the flour as directed in the recipe.
To see if the water needed to be warmed for the active dry yeast to work we made two test batches. One with room temperature water and the other with the water warmed to 105F. Both bread loaves baked up nicely with no noticeable difference. So you can warm the water if you want but we didn’t find it necessary.
Can whole wheat flour be used?
Yes, whole wheat flour can be substituted for half of the flour. The loaf below was made using 1 cup of white whole wheat flour and 1 cup of bread flour (plus some cinnamon, raisins, and a few chopped walnuts).
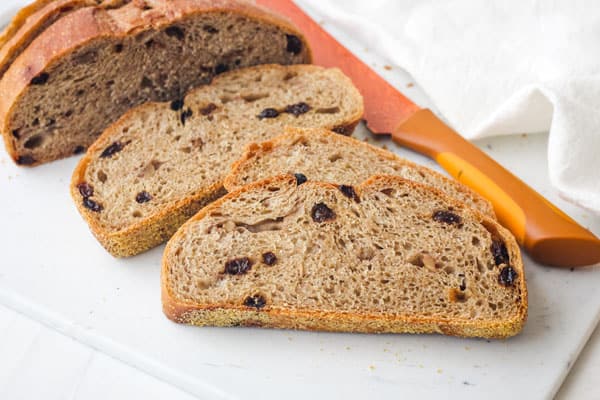
The cooled loaf did have a denser texture but was very tasty, it even earned a thumbs up from our 7-year-old nephew!
So there’s no need to heat up the DO before baking?
That’s correct, Veron! You don’t need to preheat the Dutch oven.
Brie,
I want to try this recipe, however I live at 7000′ above sea level. Will I need to make adjustments?
TGS in Santa Fe
Hi Tami,
It looks like we’re at an elevation of 1,207′ so I think you’ll need to make some changes.
Unfortunately, I’m unfamiliar with high-altitude baking. But I did some research and think I have found good resources that will provide accurate and helpful information for you.
The first one is from King Arthur Baking, its a quick overview of some changes. Near the top, they also link to guides with even more info. You can see it here: https://www.kingarthurbaking.com/learn/resources/high-altitude-baking.
The second is a website called Curly Girl Kitchen dedicated to high-altitude baking. I’m sure the entire site will be great for you but you might want to start with their no-knead bread recipe.
There are lots of comments mentioning successful bakes in a variety of locations including Arizona and Colorado. You can see it here: https://curlygirlkitchen.com/high-altitude-no-knead-bread-rustic-artisan-boule/.
I hope this helps you get your bread baking on!
~ Brie
Hi, two quick questions: 🙂
(1) I’m allergic to corn, is there something I can substitute for the cornmeal in the bottom of the Dutch Oven? Or could I omit it entirely?
(2) I ordered a Zojirushi toaster oven the other day that should be delivered this weekend. It has a ‘Rise’ setting for the second rise (your Step #3) that supposedly holds at 100F. Do you think that would work for this recipe? Logic also says that if the oven has been at 100F for a couple of hours, it would quickly get up to 425F instead of needing to be preheated from a cold start.
To be honest, I was rearranging a cabinet and found my 2 qt Le Creuset that I forgot I’d had from when we moved here 10 years ago, lol. Immediately wondered if I could use it for a small loaf of bread!
Hi Ellie!
1) Yes, you can omit the cornmeal – it just helps to prevent sticking and adds a little crunch. You could rub a bit more oil or add a square of parchment to the bottom of the pot if you want.
2) The proof setting is a great idea for the second shorter rise. However, I would check on the dough earlier, as it will probably rise a little faster. You don’t want it to over-proof, or it will deflate during baking and come out flat.
I hope you have lots of fun with your new toaster oven and your rediscovered Dutch oven 🙂
Happy Baking!
~ Brie
I used Semolina flour
I was looking for a 2qt. sized recipe and this looks perfect. The dutch oven fits in my Breville toaster oven but the lid is too close to the top element. In the recipe photos, did you cover your pot with a pan instead of the lid? I’ll use the oven if need be but the toaster oven would be especially nice in warm weather.
Hi Des,
I think we might have different Breville ovens and/or pots.
The red pot we used for the photos above is a 2 3/4 quart shallow Dutch oven from Le Creuset and we did use it with the lid on. The black composite knob that came with that Dutch oven was not rated for higher temps., so we swapped it for a small stainless steel knob.
There are a few photos of that Dutch oven with the new knob sitting inside our Breville Smart Oven Pro (BOV845BSS) on this post: https://toasterovenlove.com/toaster-oven-pans-with-lids/. It’s a close fit but there is space between the knob and the center heating element.
The knob on the blue 2qt Martha Stewart Dutch oven made it too tall to use in our Breville. But after I switched out that knob for a smaller stainless steel knob it fit.
If your Dutch oven doesn’t fit because of the knob there are a few options. First, if it can be removed, you can unscrew the knob and use the lid without it. I’ve seen some people plug the small hole where the knob was attached with a small piece of foil.
Also, you can try to swap the knob with a smaller one like we did. Or you can leave the lid off and cover the Dutch oven with a flat pan like a pizza pan if you have one. The goal here is to trap moisture and steam in the pot while the bread is baking.
I hope that helps, let me know if you have any more questions!
~ Brie
Thanks, Brie. Our ovens are the same but different pots. I have a Crofton 2 qt. Dutch oven from Aldi. It was less than $20 and is well made and heavy. (Great for curry!) I unscrewed the top from the lid and it fits just fine. I’ll plug the hole and get going on some bread 🙂
Hello and thank you for a great step-by-step guide, I’m now looking forward to giving it a try. ☺
Maybe you can help with something, I suspect there is an error in the ingredients part
For The Dough:
2 cups (266 grams) Unbleached All-Purpose Flour or Bread Flour
3/4 cup plus 2 tablespoons (200 grams) Water, cool or at room temperature
Hi Leo,
I’m not sure I understand your question, can you elaborate on where you think the error is with the ingredients?
We’ve had a lot of success making the bread over the years using those measurements (both cups and grams) as have our readers and recipe testers. But I know that everyone’s kitchen is different and we’re all working with a variety of ingredients/brands so I’m always open to double-checking things – we want our recipes to work for all of our readers 🙂
Thanks,
Brie
If I double this recipe to make a larger loaf, does this affect the baking time and temperature?
Hi Nicole,
I’ve never tried doubling this recipe but I don’t think you would get the same results if you did.
Instead, to make a larger loaf, I’d use a recipe originally designed for that size. Like the Lahey recipe or the Le Creuset recipes that we link to near the top of this post.
Hope that helps 🙂
~ Brie
Hi,
You’ve developed an exceptional recipe here, filling the need [knead] for a smaller loaf. I’ve been baking bread since Gerald Ford was president, and I actually like to knead dough; there’s a tremendous sensual pleasure comes with it. I would use 5-6 cups of flour, flavour them with a variety of goodies, always including some herbs, bake two loaves in either Lodge cast-iron loaf pans, or tin, and gift one to a neighbor. So, when Lahey’s first recipe came out, I wasn’t especially interested in it. A couple years ago I ran into it again, and tried it, and loved it—especially flipping the risen dough (very Christian) into the hot pot.
Now I see how carefully you’ve scaled this down, or actually re-imagined it. Going from three cups to two is a reduction of a third, but when one reduces the water by that same third, it doesn’t work. You’ve solved it.
(Try the apple cider vinegar as one of the two added tablespoons.)
(Try cornmeal instead of flour when prepping the second rise and balling it.)
Eliminating the pre-heated pot works just fine, as Le Creuset suggests. Lahey likes fierce recipes sometimes; yours is gentler; he also does it with his pizza.
(Try sprinkling the loaf with cornmeal on top also, for the second rise. It looks great after baking.)
(When Lahey flips his loaf, he exposes the seam, obviating the need for the slashing.)
I use two 2-qt Dutch ovens for your recipe: a @1960 Descoware, with white enamel, and a new La Cuisine, with a Staub-style black enamel. The second gives a darker crust.
Good job. Thank you.
Regards
Kene
Thank you, Kene, for taking the time to leave such a generous comment with lots of wonderful tips. I can’t wait to try them all with our next loaf, especially the extra vinegar and sprinkling cornmeal on top of the loaf.
Happy Baking!
~ Brie
I made this, and hands down the best tasting bread I’ve made, but it didn’t hold its shape. Baked in a 4 quart staub pan in regular oven using your directions. Very filled with airy holes, crispy on top and bottom but about 2.5” tall, not round like a boule. I’m thinking too much water, perhaps. Also, in PNW…has been rainy (though I have dry gas heat in my house)….curious what I may have done wrong. Planning on split pea soup for dinner—this will be just the ticket for dipping into a thick stew!
Hi Kim,
Thanks so much for taking the time to comment. First off great job on the crust and the flavor! I hope it was tasty with your soup, split pea sounds delicious 🙂
Shape-wise this bread is more free-form/oval and not super tall but it should have been taller than what you’ve described.
There are a few things that could have affected the bread. The dough may have had some extra moisture. Or it could have over-proofed during the second rise.
On warmer days (or if we’ve got the heater set higher making things toasty), I have to keep an eye on our dough as sometimes it will double faster. When the dough over-proofs the loaf will usually deflate/fall some when baked. The loaf doesn’t taste bad it does end up somewhat squat.
The one thing I’ve found that helps our bread to rise tall is focusing on getting the dough into a tightly shaped ball before I put it in the pot. I like the technique used in this America’s Test Kitchen video (https://www.youtube.com/watch?v=qqdDxHG8ppE) – the shaping part starts at around minute 19:16.
I hope that info helps some and happy baking!
~ Brie
Hi! This recipe sounds great but is there a way to use active dry yeast instead of instant yeast?
Hi Dani,
I haven’t made this bread with active dry yeast before. But I just looked at the Jim Lahey recipe that we adapted our recipe from and it calls for “instant or other active dry yeast.” So, I think it should work.
If you try it, I’d love to hear how things go. I’ve also added making a loaf with the active dry yeast to our to-do list and will update the post/recipe with the results.
Little update as promised: you can substitute 1/4 teaspoon of active dry yeast for the instant yeast without making any other changes to the recipe. Hope that helps!
This sounds wonderful! I am new at baking bread and this sounds easy enough. I was wondering if I can use parchment paper instead of the oil or corn meal?
Hi Debbie,
We’ve never tried it with parchment but I don’t see why it wouldn’t work. I’d probably still brush or spray the paper with a little oil before adding the dough just to make sure the bread doesn’t stick to it.
Hope that helps and that you enjoy the bread 🙂
Happy Baking!
~ Brie
I used to bake this bread (from a much used copy of the pages from a book) all the time when I had a working oven. My wall oven gave out a couple of years ago, I bought an air fryer oven and used it for everything. But baking was a challenge — things seemed to never get done in the middle and so I stopped baking bread. I stumbled across your website, bought myself a 3-quart dutch oven ($30 Pioneer Woman from Walmart) and made this bread. It came out perfect. I’m looking forward to trying out more recipes.
Woo hoo! That’s great to hear, JoAnn! Thank’s for taking the time to share about your 3qt Dutch oven – $30, what a steal 🙂 I bet it’s pretty too, her stuff is always cute and colorful.
Best wishes for lots of happy baking!
~ Brie
I made my first successful artisan loaf today using this recipe and it turned out beautifully! Although the 1st rise time was long, it was so very delicious!
Gosh, I love reading this! I’m so excited for you Susan, way to go with your fancy bread-making skills 🙂
Happy Baking!
~Brie
I have made this three times now and it has always worked so well. My husband and I are empty nesters and we love being able to make a small loaf that lasts just a couple of days. I make a lot of soups and stews in the winter and this is the perfect compliment to go with them. I may try the half wheat next time. I use the 2 3/4 Le Creuset and the loaf is beautiful!
I’m so glad to hear the recipe is working well for you, Diane! Thanks for taking the time to leave a comment and share your experience, we really appreciate it. 🙂
Happy Baking!
~Brie
Hi Brie. I’m wondering if you have ever tried this recipe using Bob Redmill’s Gluten Free 1:1 flour?
Thanks!
Hi, Suzi!
I haven’t tried it yet but I picked up a bag after I saw your comment and will give it a go later this week. I have heard that when using gluten-free flour the texture and crust can be a little different…so I guess we’ll see! I’ll make sure to take a few pics and post how the bread turns out 🙂
I have a larger Le Creuset dutch oven (not sure how many qts, but likely around 5-6), would it work to use it to bake this smaller loaf or would the loaf spread out too much? This is great! Thanks!
I think it would work since the one I baked in our 2 3/4-quart Dutch oven did spread out some but not too much. Getting the dough into a tight ball before the second rise helps a lot.
My sister and I are going to try this recipe in her larger 4 or 5-quart Dutch oven next week. I’ll make sure to take some pics and update the post with how it turns out.
Thanks for the great question, Deb!
Can u double this receipe Without problems?
Hi Jane,
I’ve never tried doubling the recipe (and don’t own a large enough pot to bake a double batch in) so I couldn’t say.
Sorry I couldn’t be more help. If you give it a try, I’d love to know it turns out. Happy Baking!