Toaster Oven Muffin Pans
A small batch of freshly baked muffins is the perfect weekend treat but finding the right muffin tin for your toaster oven can be tricky. If your current muffin pan won’t fit, we’ve got a few ideas that might!
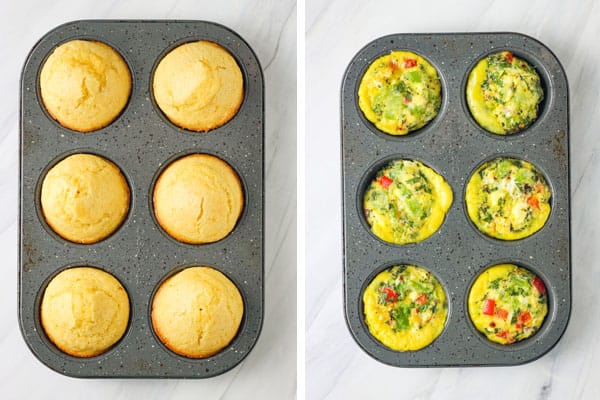
To see if we could help you find a muffin pan for your little oven, we gathered up a variety of 6-cup muffin tins and a set of silicone muffin cups.
Then we got to baking multiple boxes of Jiffy’s Vegetarian Corn Muffin Mix and a bunch of Muffin Tin Frittatas in our toaster oven.
Below we’re sharing everything we learned. From which pans brown the best to how easy they are to clean, and what you need to know about mini muffin math.
If you want to skip ahead, click on a section in the table of contents and you’ll be taken right to it.
Table of Contents
- Measuring Your Toaster Oven
- Our Top Picks
- Other Pans We Tried
- Mini Muffin Pans
- Choosing The Right Pan For You
- Toaster Oven Muffin Recipes
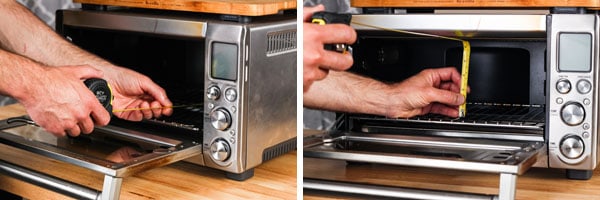
How to Measure Your Toaster Oven
Whether a 6-cup muffin pan will fit in your toaster oven is going to depend on the size of the oven and the design of the pan.
So before we get to the reviews, let’s take a minute and measure the inside of your toaster oven. Then you’ll know how much space you’ve got available and if a particular pan will fit or not.
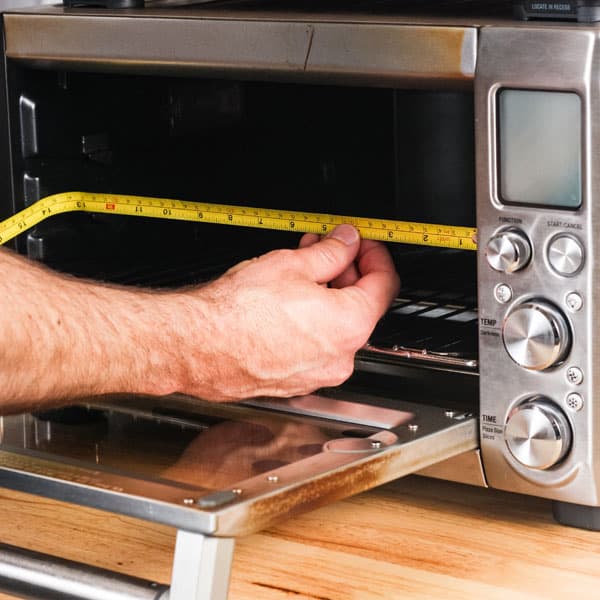
Grab a tape measure and measure the:
- Distance from one sidewall of the oven to the other (if you have rack guides that take up space measure from them).
- Oven depth, from the glass door to the back of the oven (ignore any bump-outs).
- The amount of space between the upper heating elements to the lowest rack placement (you won’t need this for the muffin pans but it’s good info to have).
Okay, now that you’ve got your measurements, let’s talk toaster oven muffin pans!
Quick Note: Toaster ovens vary greatly. Always consult your owner’s manual and follow the manufacturer’s recommendations for what materials are acceptable to use in your specific toaster oven.
Our Top Picks
While all of the pans we tried had a few quirks or tradeoffs, in the end, there were two muffin pans that stood out from the pack.

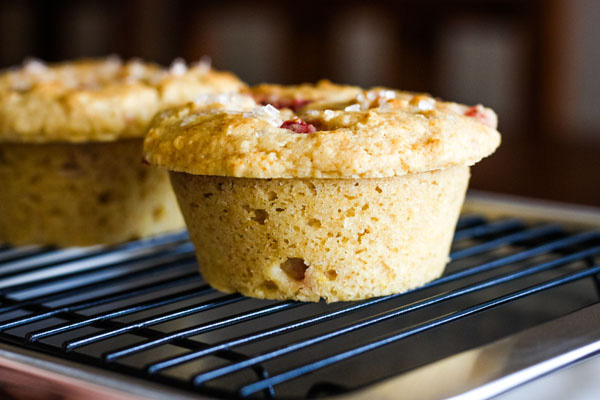
1. USA Pan 6-Cup Muffin Pan
- Exterior Dimensions: 11.125 x 9 x 1.375 inches
- Care and Use Notes: Oven-safe to 450°F. Hand wash only. Cooking spray is not recommended.
What’s Good
The cups are deep and set almost 1-inch apart so you don’t have to worry about your muffins baking together. There is a wide edge on the pan that makes it easy to move in and out of the toaster oven.
For both recipes, we brushed the pan with oil, and all of the muffins released easily without any sticking. The muffins were evenly cooked, had a consistent appearance, and tasted great.
Cleaning the pan by hand was a breeze, with just a quick rinse of soap and water and zero scrubbing.
Things You Should Know
At around $25.00 this was the most expensive pan we tried. It’s also the heaviest and biggest and will most likely only fit in larger toaster ovens.
Because of the deeper cups and the pan design, the muffins had more of a tube shape, especially the frittatas.
After washing the pan by hand there was some water trapped under the rolled edges. So far it hasn’t been a problem, but only time will tell if this leads to an issue with rust.
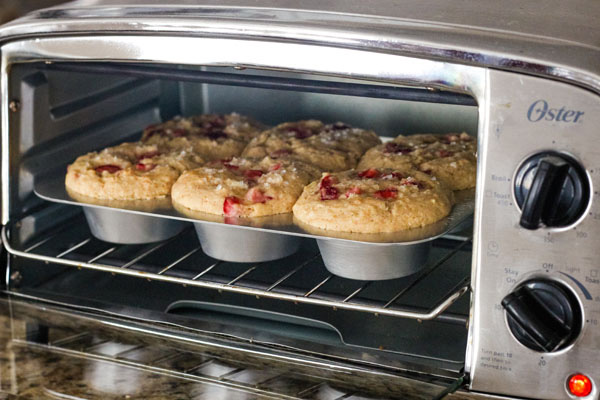
2. Casaware 6-Cup Toaster Oven Muffin Pan
- Exterior Dimensions: 10.5 x 7.125 x 1-Inch
- Care and Use Notes: Hand washing recommended, do not immerse in water. Heat-tolerant to 450°F.
What’s Good
The darker color of the pan results in flavorful muffins with golden brown crusts and nice crispy edges. In our taste test, this pan made our favorite batch of corn muffins and came in second for the frittatas.
The lack of handles or a large rim means it is more compact and can fit in most toaster ovens.
Things You Should Know
Some of the egg muffins stuck a little. They needed to be nudged out of the pan with a small silicone spatula.
The darker colored metal can cause things to bake faster and the pan is a little harder to clean (it needed a quick soak and scrub after each recipe).
There’s zero room around the outside edge so it’s easy to accidentally dent one of the muffins with your thumb when removing the pan from the oven.
Other Pans We Tried

3. Chicago Metallic Toaster Oven Muffin Pan
- Exterior Dimensions: 11.5 x 7.3 x 1.25-inches
- Care and Use: Hand washing recommended. Oven-safe to 450°F

What’s Good
This was the first muffin pan we bought for our toaster oven (it was part of a set). For over 6 years it has consistently baked up golden browned muffins with crispy edges and moist interiors.
The pan has extra-long edges on two sides that work as handles making it easy to move in and out of the toaster oven.
While the cups are placed closer together I’ve never had an issue with muffins baking into each other.
Things You Should Know
Some of the muffins did stick when removed and one left a few chunks behind (this is an older pan and the nonstick coating is not as great as it used to be). The dishwasher is not recommended for this pan.
It is harder to clean and does require more elbow grease when scrubbing, it was not as easy to clean as the other metal pans. Also, the rolled edge can trap water and potentially rust over time.
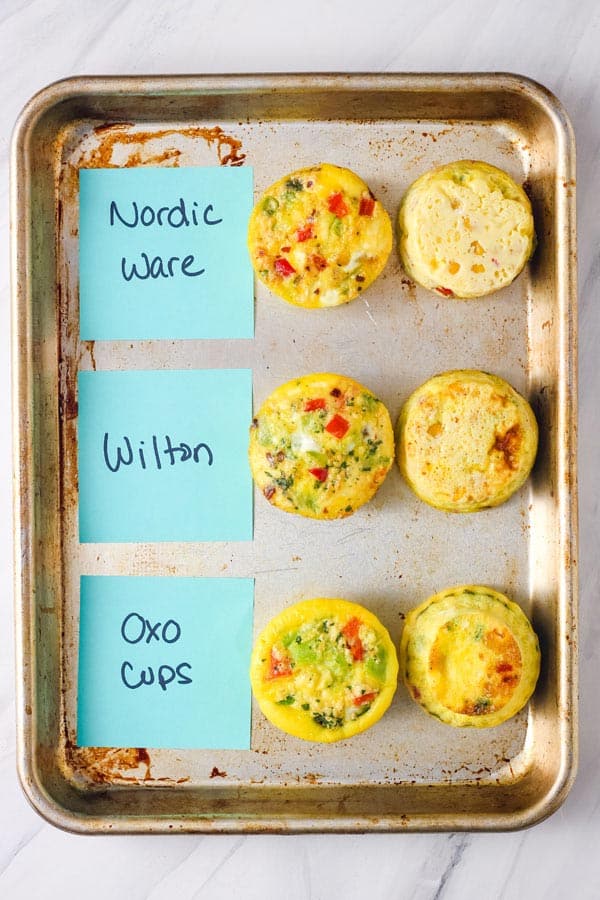
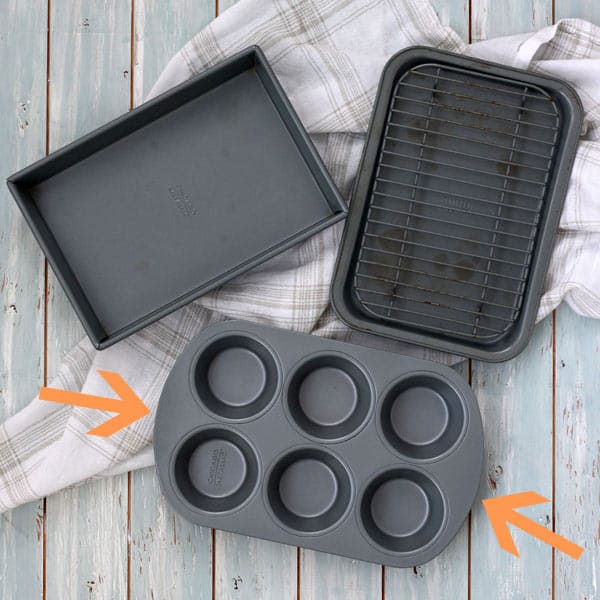
4. Nordic Ware Compact Oven Muffin Pan
- Exterior Dimensions: L: 7 in. W: 10 in. H: 1.3 in.
- Care and Use Notes: Dishwasher use is not advised, hand wash only.

What’s Good
Although we did have some sticking with the muffins, the pan was very easy to clean. Because the cups are pressed from a single piece of metal there are no crevices where water can get stuck and rust.
The pan is very lightweight and has at least some room (but not a lot) around the edge to grab it when removing the pan from the oven.
Things You Should Know
The cups are less than 2.75-inches wide across and are placed close together. Depending on the size of your recipe, there’s a good chance the muffins will end up baking into each other.
This pan took the longest to bake both recipes and the muffins had zero browning on the bottom or edges. It was almost like the pan reflected the heat instead of absorbing it. The lack of browning resulted in flavorless corn muffins and bland frittatas.
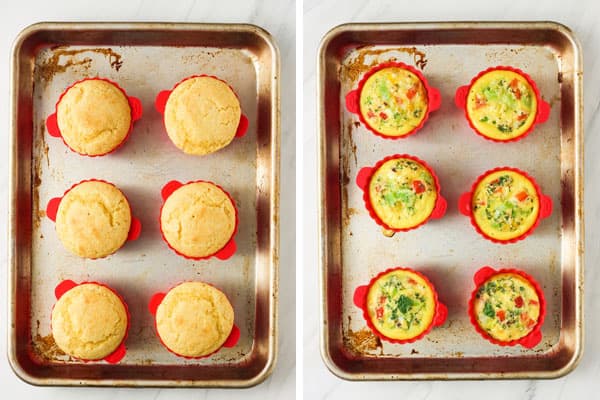
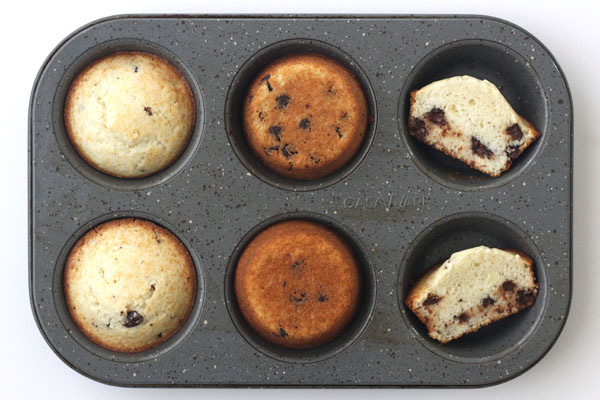
5. Wilton Easy Flex 6-Cup Muffin Pan
- Exterior Dimensions: 7 x 10.875 x 1.25 inches
- Care and Use Notes: Dishwasher safe. Also, I reached out to their customer service and was told “Our silicone molds can be used in a toaster oven; they are oven safe up to 375 degrees F.”

What’s Good
The silicone was very easy to clean and the pan can be washed in the top rack of a dishwasher. Both batches of muffins released easily without any sticking regardless of if the pan was oiled or not.
Things You Should Know
The pan is floppy and needs to be placed on a cookie sheet to keep it stable during baking and to move it in and out of the oven safely.
The individual cups are 2.75-inches across, about ¼-inch smaller than a standard muffin pan.
Our muffins had very little browning and in the case of the egg muffins took longer to bake.
Even after thoroughly washing the pan before using it, both of the recipes we baked had a terrible chemical flavor that made them inedible.
6. OXO Air Fryer Cups
- Individual Cup Dimensions: Height is 1.375-inches, Bottom Width is 1.875-inches, Top Width is 2.75-inches (or 3.25-inches with handles)
- Care and Use: Handwash or dishwasher safe (top row only). Also, I was told by their customer service “Yes, the baking cups and air fryer cups can be used in a toaster oven up to 450F.”
What’s Good
To see how non-stick the cups were we made both recipes with half of the cups greased and the other half ungreased. All of the muffins released easily and with barely any sticking or residue left behind.
The cups are quick to clean by hand and can be put in the top rack of a dishwasher.
They are a convenient alternative for ovens where a standard metal muffin pan won’t fit and can be used in other appliances like an air fryer, microwave, or Instant Pot.
Things You Should Know
Silicone is not great at conducting heat so baked goods (like our muffins) did not brown the same as those baked in most of the metal pans.
We found the lack of browning on our corn muffins meant the edges did not get crispy and the flavor was kind of bland.
Similar to the Wilton pan, the cups have to be placed on a sheet pan or inside a muffin cup to be used in the toaster oven. The cups are fairly narrow from top to bottom and are not as wide as a standard muffin cup.
Toaster Oven Tip
Not all silicone bakeware is meant to be used in a toaster oven. Some silicone may melt or deform. If you’re not sure about a pan you own, always reach out to the manufacturer for guidance before using it in your toaster oven.
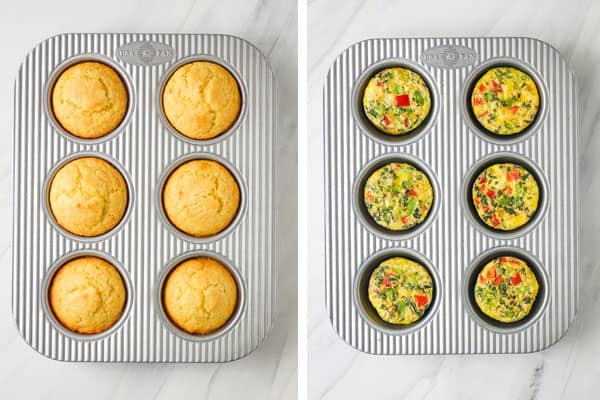
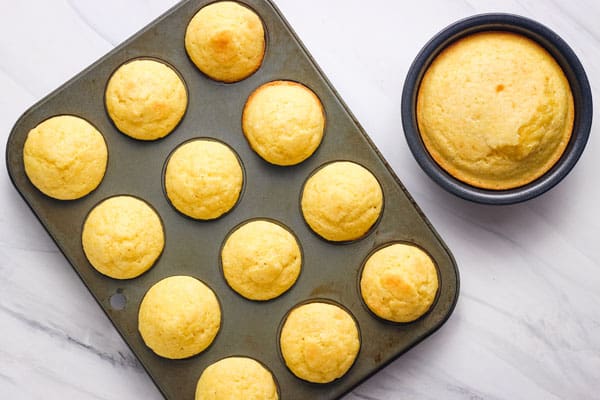
Corn Muffin Results
To see how the pans compared we mixed up 6 boxes of Jiffy Vegetarian Corn Muffin Mix.
In addition to the milk and egg called for on the box, I always add 2 tablespoons of plain Greek yogurt to the batter. The yogurt makes the muffins nice and tender.
To prepare the pans, all of the muffin cups (including half of the silicone ones) were brushed with canola oil. Then we evenly divided the batter between the cups.
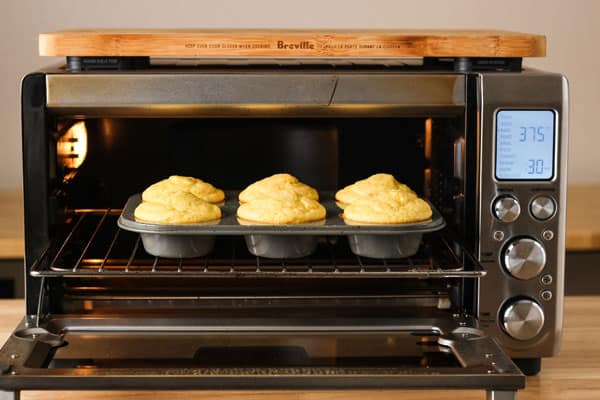
We baked each batch at 375°F on the bottom rack level in our Breville Smart Oven Pro (BOV845BSS). *The box instructions are for 400°F but I’ve always found the muffins bake up better in a toaster oven if we reduce the temperature.
Overall, there was not a big difference in the cooking times, all of the batches were ready after 13 to 15 minutes.
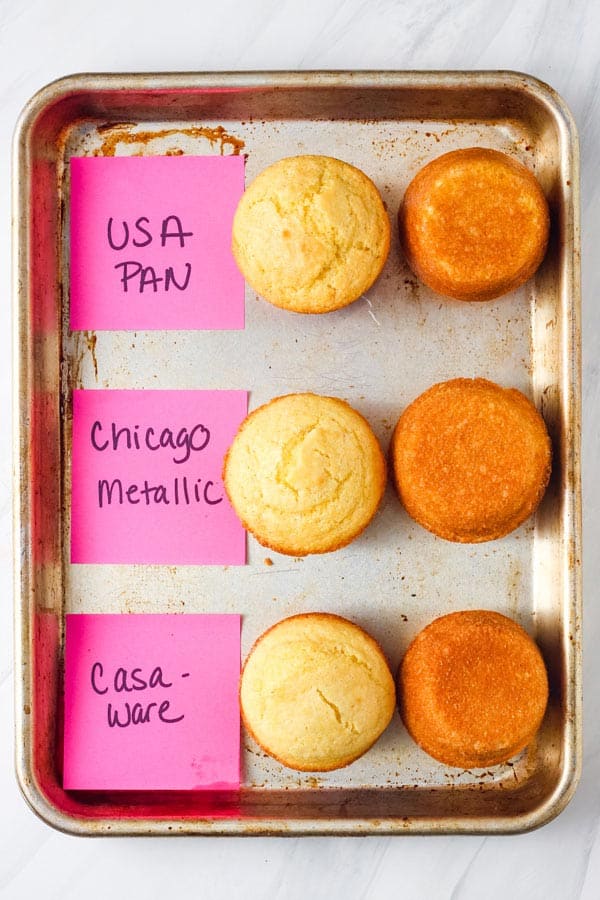
1. USA Pan: Evenly browned, crisped on the edges, with a tender crumb and good flavor.
2. Chicago Metallic: nice rounded tops, nicely browned on the bottoms and sides, crispy, tender, and flavorful.
3. Casaware: The muffins rose up tall with domed peaks. They were evenly browned on the bottoms and sides, had crispy edges, and tasted the best of all the batches we baked.

4. Nordic Ware: The muffins had zero browning and looked almost like vanilla cupcakes. They were very moist inside, only crispy on the top, bland and flavorless.
5. Wilton: The muffins had strange flat tops and were only browned on the bottom. Even though we had cleaned the pan before using it the muffins had a terrible plastic/chemical flavor that made them inedible.
6. OXO: The cups made cute little muffins with rounded domes. They were only browned on the bottom, had zero crispy edges, and tasted fairly bland.
Cleaning Up The Pans
The silicone pan and cups along with the USA pan and the Nordic Ware pan were easy to clean with a quick rinse of soap and water. Both the Chicago Metallic and Casaware pans required a short soak and scrub to get completely clean.
Frittata Muffin Results
To see how the pans would handle something super sticky like eggs, we prepared 6 batches of our frittata muffins recipe.
For the silicone, we sprayed half of the cups with oil and left half ungreased. We generously sprayed the other pans with cooking oil spray, except for the USA Pan which we brushed with canola oil (as the care directions advise against sprays).
We baked each batch at 350°F on the bottom rack level in our Breville Smart Oven Pro. With the exception of the Nordic Ware pan and the Wilton pan, the muffins were ready after 19 minutes of baking.

1. USA Pan: These muffins were the most evenly and consistently cooked. While they had zero color or browning, they were very tasty.
2. Chicago Metallic: The muffins set around the edges too fast causing the filling to bubble over the cups during cooking. The muffins had very little browning but tasted good.
3. Casaware: Similar to the previous muffins, the filling spilled over the cups a bit about halfway through the cooking. Overall the browning was a little uneven but the flavor was fantastic.
4. Nordic Ware: With 24 minutes of cooking time, these muffins took the longest of all of the batches. The texture of the muffins was denser (not light and spongy), they did not have any browning, and due to the longer cooking time, the veggies had softened more and were not as flavorful.
5. Wilton: These muffins also took a little longer to cook, about 22 minutes. They had a little browning on the bottom and looked good. Unfortunately, they had that same chemical flavor as the corn muffins and we had to throw them out.
6. OXO: The cup shape caused the muffins to bake in a strange way that forced all of the mixins to center. Despite their odd tulip-like appearance, the muffins did taste fine.
Cleaning Up The Pans
Similar to cleaning up after the corn muffins, the Wilton, OXO, USA Pan, and Nordic Ware pans were all easy to clean while the Chicago Metallic and Casaware pans required a little scrubbing.
What About Mini Muffin Pans?
I love to use our mini muffin pan to bake up this mini banana bread recipe. It makes 12 cute little muffins that are perfect for snacking.
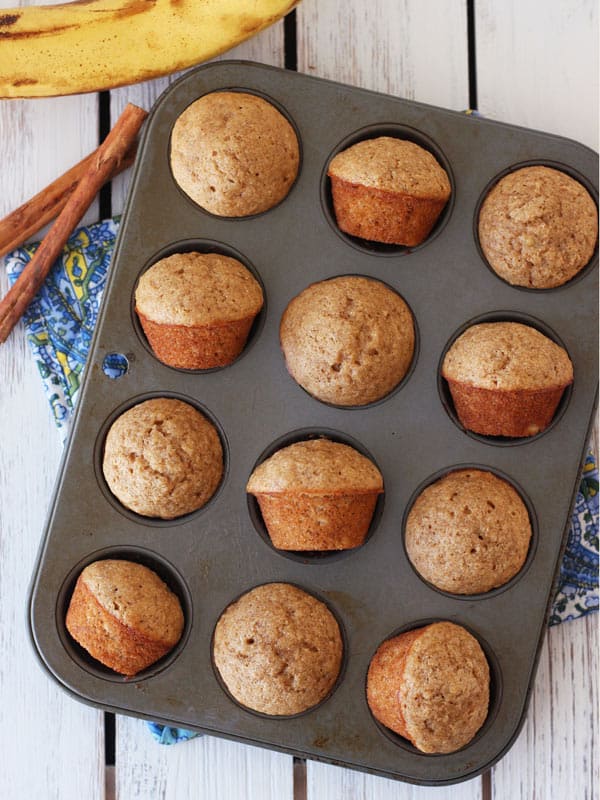
Our pan doesn’t have any labeling but I think we got it at the grocery store. You can also find mini muffin pans at most discount houseware stores (like HomeGoods and TJ.Maxx) or department stores.
One thing to keep in mind is Mini Muffin Math:
- 1 regular muffin = 3 mini muffins
- 6 regular muffins = 18 mini muffins
- 12 regular muffins = 36 mini muffins
If you want to bake a recipe that makes 6 full-sized muffins with a 12-cup mini muffin pan, you will have some leftover batter.
There are a lot of ways to deal with the extra batter. You could wash the pan and then bake the rest, use individual silicone cups, or grab some small ramekins.
For the batch of mini muffins pictured above, I use a second pan (the small round pan from our toaster oven breakfast sandwich recipe) to bake the leftover batter.
How to Choose The Right Pan For You
Whether you’re thinking about getting a 6-cup muffin pan, silicone muffin cups, or a mini muffin pan, here are a few questions to ask yourself.
How much room is there in your toaster oven?
If you didn’t measure your toaster oven earlier, take a minute and get that done. Then you can compare the exterior measurements for any pan you are looking at against those measurements. Nothing is more disappointing than buying a pan that won’t fit in your little oven.
Would a non-traditional muffin pan work better for you?
If your oven is very small, there are 4-cup muffin pans available online. We haven’t baked with them but with the recent rise in popularity of air fryers, they are becoming more common.
If you have a larger toaster oven but can’t fit a 12-cup muffin pan, I have seen square 9-cup muffin pans before. That might be a good option, you’d just need a plan for baking the leftover batter if your recipe makes a dozen muffins.
And don’t forget to check with the manufacturer, some (like Ninja) make special muffin pans for their toaster ovens.
What material do you want the pan to be made out of?
As we discussed in this post about how to bake muffins in a toaster oven, the material the pan is made out of makes a big difference.
Muffins baked in darker pans and pans made of metals that absorb heat well will have more browning, crispier edges, and (in my opinion) better flavor.
Thin metal pans and silicone are not great heat conductors. Muffins baked in those pans will have little to no browning and may take longer to cook.
How much space do you want around the rim of the pan?
If there aren’t handles or a wide edge that you can grab, it’s easy to accidentally press your thumb into one of the muffins when removing the pan from the toaster oven.
This may or may not bother you. I do it all the time with our mini muffin pan and just consider that muffin my taste-tester!
Do you want a lot of space between your muffins?
If the cups are very close together (less than ½-inch) the muffins could bake into each other.
What about cleaning?
Do you want to toss the pan in the dishwasher or are you okay with scrubbing a little? Good metal pans will either be hand wash recommended or hand wash only.
There are no right or wrong answers to these questions – just what works best for you and your toaster oven.
Toaster Oven Muffin Recipes
Once you’ve got your pan sorted, try one of our toaster oven muffin recipes. Each recipe makes just 6 muffins or less.
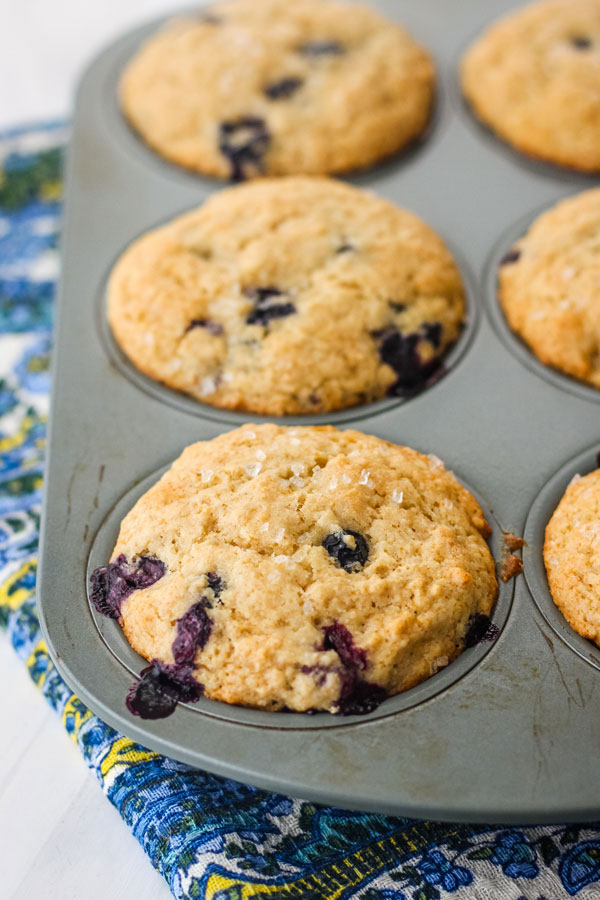
- Toaster Oven Blueberry Muffins
- Cornbread Zucchini Muffins
- Toaster Oven Oatmeal Raisin Muffins
- Cake Mix Pumpkin Muffins
- Raspberry Lemon Corn Muffins
- Chocolate Pumpkin Muffins
And if you haven’t been reheating muffins in your toaster oven, you are missing out. The muffins get crispy and lightly toasted outside while the tender middles are warmed through – it’s delicious.
Happy Baking!
Your Turn
Do you have a favorite toaster oven muffin pan? Share in the comments below!
So glad I found this site. I’m 77 years old and just got my 1st toaster oven when my toaster stopped. I have a Cuisenart small size for just my husband & I. My oven took so long to heat and never holds heat correctly so I’m hoping this works. The instruction book is scary – don’t do this/don’t use that…. Your site seems very instructive and interesting. Thanks!
Hi Loraine,
Welcome to Team Toaster Oven – we’re so glad you’re here 🙂 Try not to be too intimidated by the instruction manual, for the most part, a toaster oven is just a mini countertop oven.
The biggest difference is the exposed heating elements. You want to be mindful of them and keep anything like food or foil from touching the elements.
Until you get used to how your oven heats, check on your food a little earlier and reduce the temperature if things are browning too fast. In no time you’ll be very comfortable with how your little oven heats and cooks.
If you have any questions, feel free to leave a comment or send us an email. We’re always here to try and help.
Deep breath, you’ve got this!
~ Brie