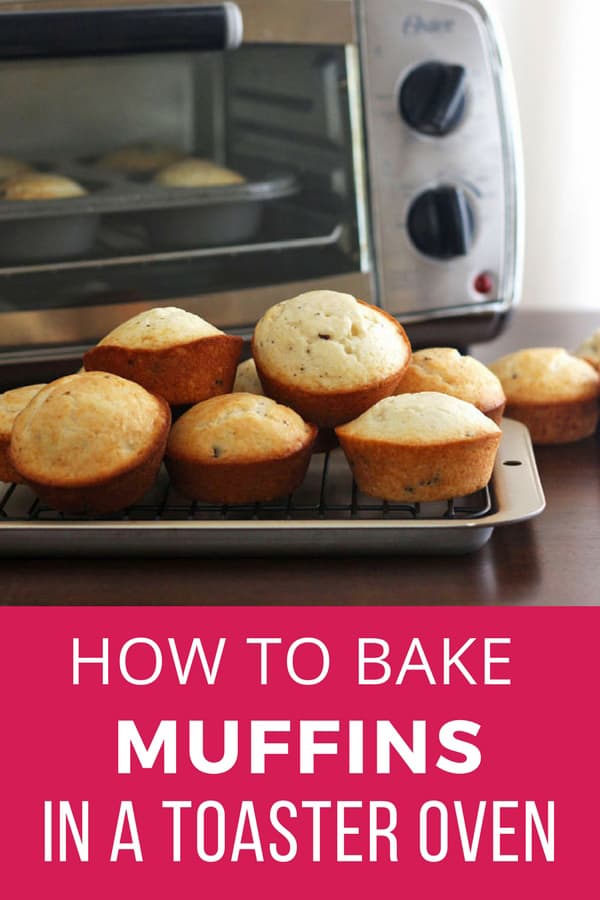
How to Bake Muffins in a Toaster Oven
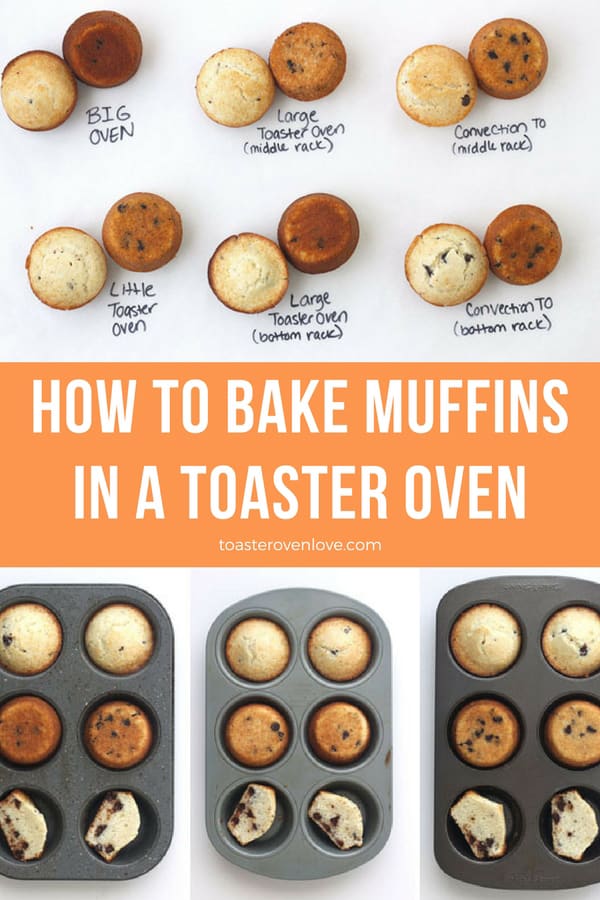
If you’re new to baking with a toaster oven you might be wondering what’s the best temperature setting, rack placement, and type of muffin pan to use when baking muffins? To answer all of those questions and more we baked 11 bags of muffin mix. Today we’re sharing the results and how to bake muffins in a toaster oven.
Baking with a toaster oven is a lot like using a traditional oven. But over the years, I have noticed a few differences.
Like how most recipes bake faster in a toaster oven. Or that the rack placement can affect how your dishes turn out.
Last year, a reader named Wanda left a comment on our toaster oven cookie tips post looking for muffin tips.
Instead of just sharing our random toaster oven baking knowledge, Tim and I wanted to give you (and Wanda) the best toaster oven muffins tips post we could.
So off we went to the grocery store for supplies. Then we pulled out every muffin pan in our house, heated up the oven and toaster ovens, and got to baking.
Our Toaster Oven Muffin Experiment
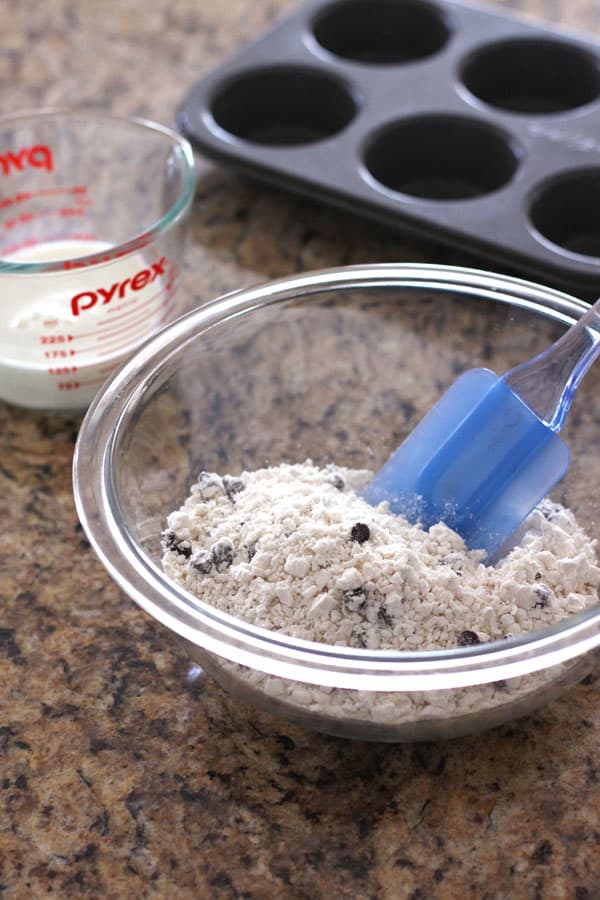
In an attempt to keep the dirty dishes to a minimum and eliminate other variables that could affect the results (like over or under-measuring ingredients) we decided to use a muffin mix and settled on a basic chocolate chip variety.
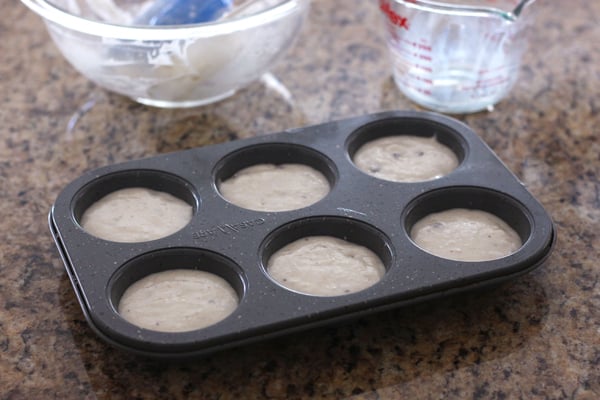
Each bag of muffin mix makes six medium/regular-sized muffins. The only other ingredient called for is 1/2 cup of whole milk.
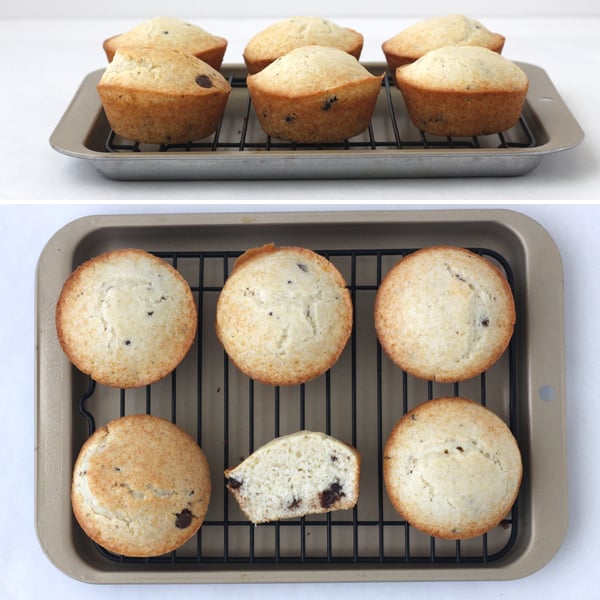
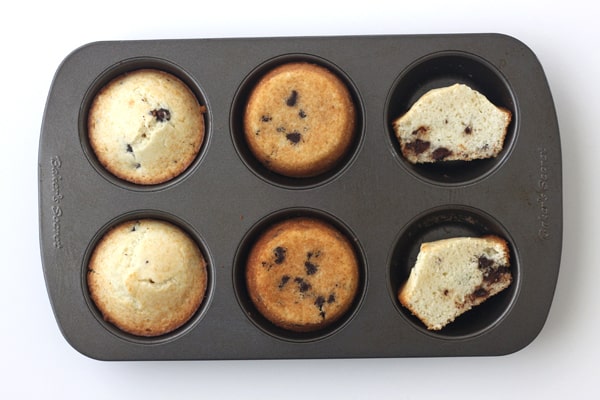
To bake the muffins, we used our Casaware 6-cup muffin pan for these first batches since I knew it would fit in even our smallest toaster oven.
To see all of the muffin pans we use in our ovens check out this Toaster Oven Muffin Pans post.
Don’t Believe The Beep
Whether you’re using a regular full-sized oven, a basic toaster oven, or a convection toaster oven you should always preheat before baking.
Many large toaster ovens, including our Breville Smart Oven Pro (BOV845BSS), are designed to alert that preheating is complete when the oven has reached 75% of the display temperature.
For all of the batches, we used an oven thermometer to ensure the oven and toaster ovens used were preheated to the full recipe temperature prior to baking.
Okay, you ready? Let’s do this!

Baking With an Oven vs. a Toaster Oven
Here are the original muffin mix package directions:
- Heat oven to 400°F and grease muffin pan.
- Combine 1/2 cup milk with muffin mix and stir just until moistened.
- Fill muffin cups 2/3 full.
- Bake at 400°F for 14 to 16 minutes until golden and a toothpick comes out clean.
- Cool in pan for 2 to 3 minutes.
To start, we made the mix as directed and then baked the first batch in our regular full-sized oven. I think it was excited to finally get a little use and attention.
- Temperature: 400°F
- Rack Position: Middle
- Preheat Time: 11 minutes ~ Bake Time: 14 minutes
The muffins were overdone after just 14 minutes! Even though I used the middle rack placement the bottoms of the muffins were hard and a little dry around the edges. Though they did have nice tops and tender middles.
This was a good reminder to me that recipe bake times are a guide, not a rule. There’s no way for any recipe developer to know how EVERY traditional oven or toaster oven will bake, all of them are different.
That’s why the best way to check for doneness is using your senses:
- Touch: Do the muffin tops spring back when you press them?
- Smell: Is your kitchen filled with the sweet aroma of baked goods?
- Sight: Are the muffins browned (if the directions stated browning)? When you insert a toothpick in the center of a muffin does it come out clean or with a few crumbs? BTW, if you see wet batter, keep cooking!
Also, toaster ovens aren’t the only ones lying about their temperature. Even though our traditional oven indicated it was preheated after 8 minutes it didn’t reach 400°F on the thermometer inside until it had preheated for 11 minutes total.
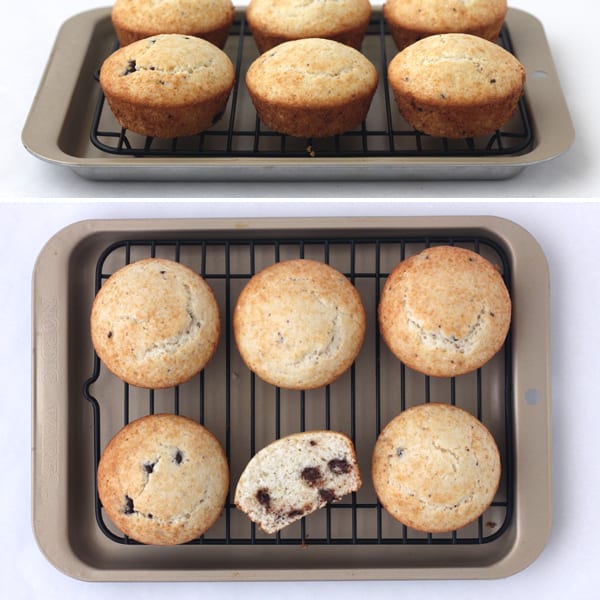
Next, we baked the muffin mix in our little Oster Toaster Oven.
- Temperature – 400°F (dial set at 375°F – see the temperature note below)
- Lower rack position
- Preheat Time: 5 minutes! ~ Bake Time: 13 minutes
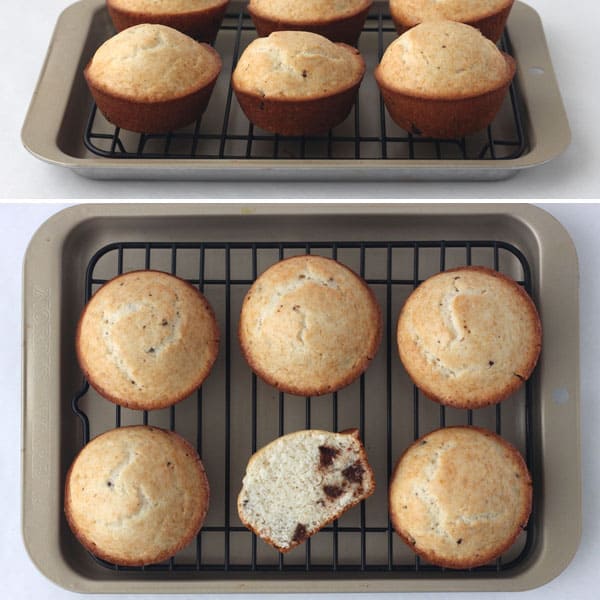
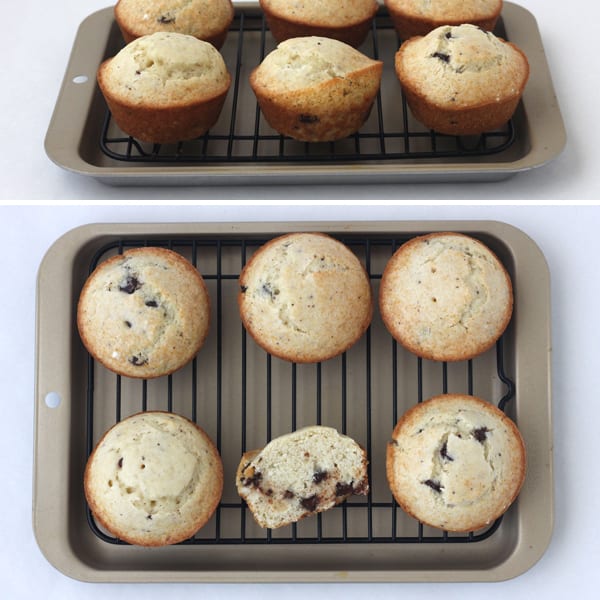
We were super impressed with the muffins from our little oven. The edges were golden and slightly crispy while the top and center where light and tender.
After waiting 11 minutes for our traditional oven to preheat I was a little blown away when this toaster oven only took 5 minutes to preheat.
But then something funny happened.
While I was writing down the preheat time the temperature jumped up to 450°F! I turned the temperature dial down to 375°F and after a minute the temperature returned to 400°F and stayed there.
Clearly, our little toaster oven runs warm.
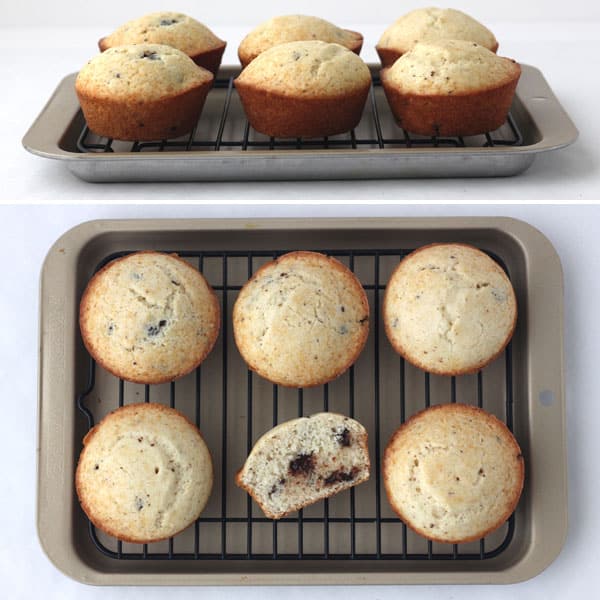
Lastly, we baked a batch in our Breville Smart Oven Pro (without the convection)
- Temperature: 400°F
- Rack Position: Middle
- Preheat Time: 7 minutes ~ Bake Time: 11 minutes
This batch was my favorite and the most evenly cooked of the three. The muffins had nicely rounded tops, a light tender crumb, and golden outsides.
Because the Breville Smart Oven Pro’s manual suggests the bottom rack placement for baked goods like cakes we made a second batch changing only the rack placement to see if the muffins were any different.
The muffins baked on the bottom rack had high peaks, and harder edges, and were slightly overcooked after just 10 minutes.
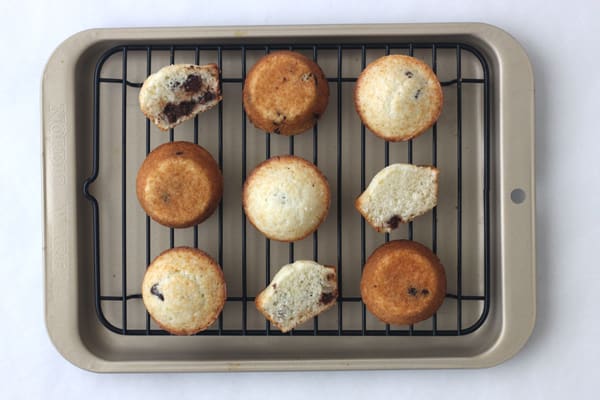
Here’s a look at the muffins side-by-side and a peek at the ones we baked with convection later in the post.

6 Toaster Oven Muffin Tips
1. Toaster oven muffins bake in the same amount of time or QUICKER than a traditional oven. For the best results, begin checking on your muffins two to three minutes earlier than the shortest cook time listed on your recipe.
2. Recipe cook times are guidelines – not rules, uses your senses (touch, smell, and sight) when checking to see if your muffins are baked.
3. Since the muffins bake faster, it’s okay to turn down the temperature a little if you want. I like to preheat to the recipe’s temperature but then reduce it by 25°F when I put the muffins in to bake. Your muffins may take a little longer but you shouldn’t have any problems if you stay between 325°F and 400°F.
4. Toaster ovens preheat at least 30% faster than a traditional oven. The smaller the toaster oven – the less space to heat – the faster it will preheat.
5. The middle rack placement would be my first choice for a larger toaster oven/countertop oven. If you use the bottom rack just check on your muffins earlier.
6. ALL ovens lie about their temperature, invest in an oven thermometer, and use it regularly!
Next, we wanted to tackle the harder question of can you bake muffins in a convection toaster oven?
Convection Baking
When using a convection toaster oven, the common recipe adjustments suggested are to reduce the temperature by a minimum of 25°F and begin checking for doneness 2/3 to 3/4 through the cooking time.
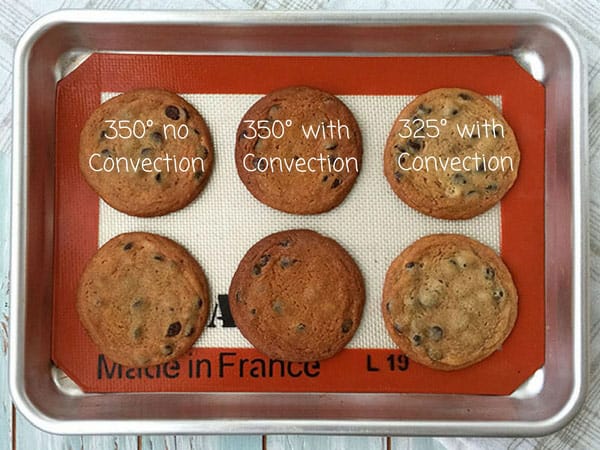
Should The Temperature Be Even Lower For Baking Muffins?
Yes. At least according to Beatrice Ojakangas.
In the Convection Oven Cookbook, Beatrice suggests you should “lower the temperature 50° to 75°F…” But she does caution that you should not reduce the temperature below 300°F.
Will The Muffins Bake Faster With Convection?
Maybe.
Your muffins may bake faster, take the same amount of time or even bake slower depending on the recipe, type of mix-ins, and pan used.
Because every recipe and toaster oven are different, even with adjustments you should still begin checking for doneness about 2/3 to 3/4 through the recipe’s original baking time and add more time as needed.
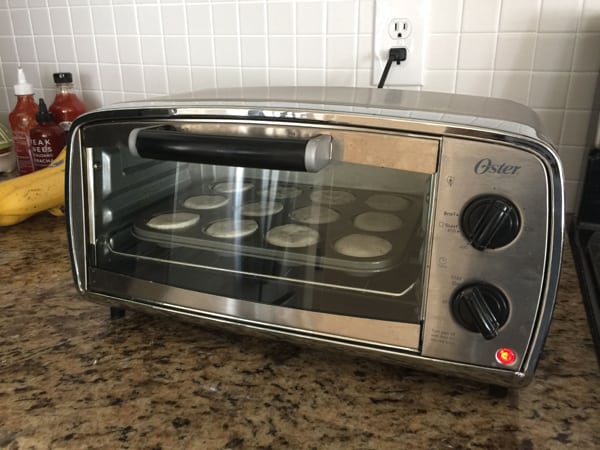
For these batches we baked the muffins in our preheated Breville Smart Oven Pro with the Convection Fan turned on.
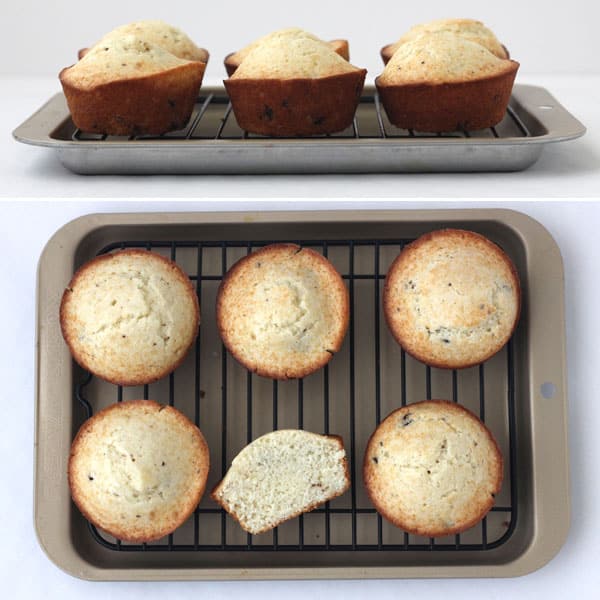
Convection Muffins Batch #1
- Temperature: 350°F
- Middle Rack Placement
- Bake Time: 12 minutes
Convection Muffins Batch #2
- Temperature: 350°F
- Bottom Rack Placement
- Bake Time: 10 minutes
Both batches had uneven tops and browning. While I wouldn’t throw away either batch they were not my favorite.
Conclusion: Convection would not be my first choice when baking muffins. However, if convection is your only option, lower the temperature by 50 to 75 degrees and check for doneness early.
What About Mini Muffins?
If your toaster oven can’t fit a standard muffin tin, a mini muffin pan might be a good solution.
Two things to know about mini muffins:
- A full-size muffin is equal to about 3 mini muffins, so a 6-muffin recipe will make about 18 mini muffins.
- Since mini muffins are 1/3 the size of a regular muffin, they bake faster. Start checking for doneness at about half the time of the original recipe, adding more time as needed.
Little Oster Batch: Baked for 9 minutes at 400°F (dial set at 375F – since we know this toaster oven runs hot).
Results: The muffins were light and fluffy but a little pale on top.
Breville Countertop Oven Batch: Baked at 400°F, no convection, using the middle rack placement for 8 minutes.
Results: The muffins were a little overdone, next time I’d either take them out a minute earlier or reduce the temperature by 25 degrees.
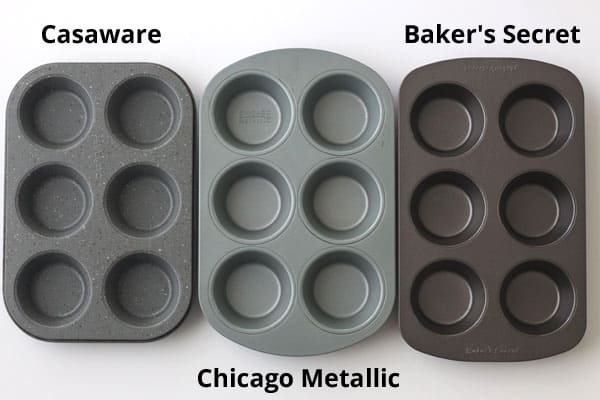
Things To Know About Pan Color And Materials
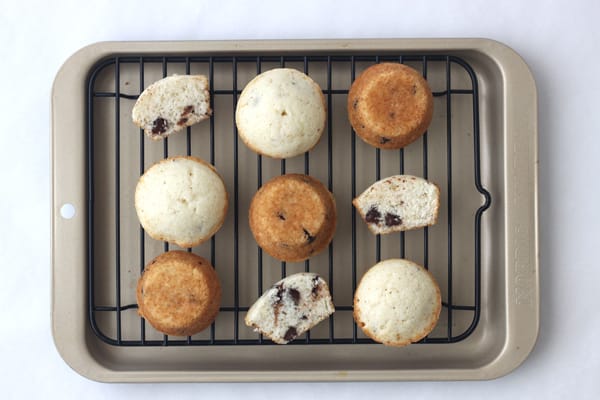
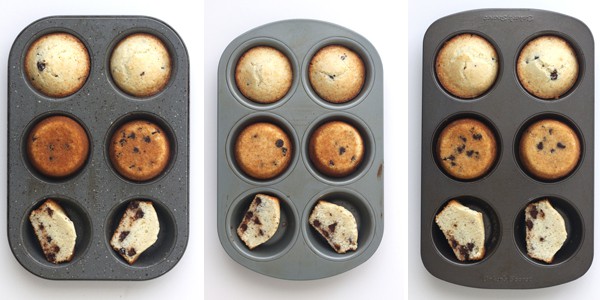
To see how the color and material of the muffin pan affected the muffins I pulled out the three 6-cup muffin pans we own and used our large Breville to bake a batch using each one.
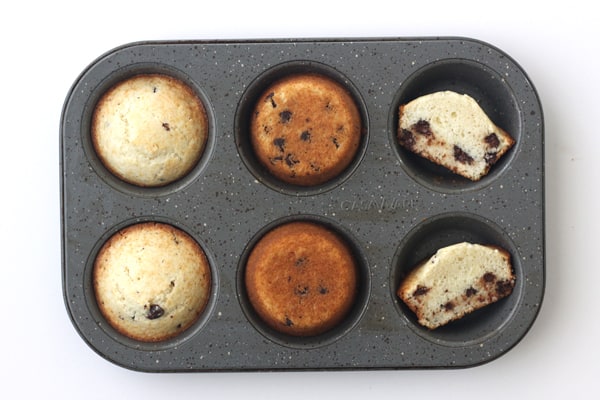
Casaware Non-Stick Ceramic Coated Muffin Pan
These muffins baked slightly faster than the other pans by about 1 minute. The bottoms were darker with crisper edges.
Chicago Metallic Aluminized Steel Muffin Pan (from their toaster oven pan set)
These muffins were light and fluffy with nice round muffin tops. I liked them but Tim thought they tasted more like cupcakes than muffins which he let me know was not a good thing.
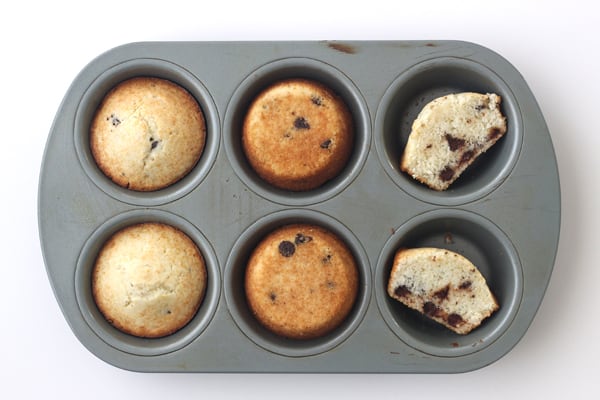
Baker’s Secret Basics Premium Nonstick Muffin Pan (we got this one at Ralph’s ages ago)
Like the Casaware batch, these muffins were darker with crisp edges.
So which pan should you use to bake muffins?
The differences between the muffins baked in each pan are pretty small, so I’d say my top priority would be finding pans that will fit in your toaster oven.
Then, think about what you’re looking for in your muffins.
If you want softer (more cake-like) muffins use a lighter pan. If you want a muffin with crispy edges use a darker pan.
Well, that’s it for our big fat muffin experiment.
Since you’re a toaster oven muffin expert now, why don’t you grab a pan and make a quick batch of your favorite muffin recipe or give one of our Toaster Oven Muffin Recipes a try?
Happy Baking!
P.S. If you found this post helpful, can you let us know in the comments? We’re thinking about doing more toaster oven experiments with frozen pizza or brownie and cake mixes.
P.P.S. This post was inspired by all of the fantastic ultimate guides at handletheheat.com, if you enjoy baking in a traditional oven too you should check them out.
Thank you I just got a big Oster counter top toaster oven. Your comments help I am now going to try to cook some blueberry muffins.
I’m so glad the info was helpful, Linda. I hope the muffins turn out great and you have lots of fun with your new kitchen toy!
I going to try your way, I try to do muffins, but will harden on top, soft/mush on bottom in cup, waste of my time,,hope will go better now, mike
So very thankful for your wonderful website as I’m just getting started with using a toaster oven instead of a conventional oven. My elderly neighbour raves about her toaster oven & the monthly savings she can see on her electricity bill when she quit using her conventional oven. Your information is making the transition a thing of joy! Thank you
Hi,
I have a tiny toaster oven, so muffin pans don’t fit. Can I use silicone muffin forms?
Thanks
Hi Mary,
Those little silicone muffin cups can be a good option but because silicone bakeware varies greatly by manufacturer you’ll want to use caution. It can sometimes melt or deform in a toaster oven, especially if the cups are only meant for baking at lower temperatures.
We have used a set of OXO air fryer muffin cups to bake cornbread mix and mini frittatas in our toaster oven without a problem. You can check out the cups and learn more about baking with silicone in this post: https://toasterovenlove.com/toaster-oven-muffin-pans/.
Hope that helps!
~ Brie
I really appreciated this VERY professionally performed experiment. I’m a newcomer to toaster ovens and just knew that they should be used for more than frozen dinners. I’ve got my last batch of muffins in my “real” oven and will, in the future, be more E-knowledgeable because of your fantastic information.
Thank you for taking the time to comment, Anita. I’m so glad you found the info and tests helpful!
You’re right about toaster ovens, they are great for cooking all kinds of things, especially in the summer 🙂
Happy Baking!
~ Brie
Thanks for your helpful posts! I still have a question though about making muffins and cupcakes in my new Black & Decker toaster oven. Is it safe to line my metal 6-cup muffin tin with paper liners I often used in baking cupcakes or muffins in my large Kitchenaid wall oven? I don’t want to start a fire!
Hi Debbie,
Most toaster oven manuals do include a warning in the Important Safeguards section to not put paper in the ovens. How literal they intend that statement to be is going to depend on the manufacturer. So this is probably something you’ll need to ask Black and Decker about.
It looks like they have a customer number you can call M-F on their website on the Support page here: https://www.blackanddeckerappliances.com/About-Us/Consumer-Services.aspx
Happy Baking!
Brie
Thank you …. soooo appreciate your extensive research. helped a million !! here’s to my first attempt in the Breville Smart Oven Pro (with convection turned off:-)
thanks for the precious tips
Natalie
Hi Natalie, I’m so glad this was helpful for you – I hope your muffins turn out great 🙂
Happy Baking!
This post is absolutely everything I needed, and I can’t thank you enough! Your thoroughness and attention to detail are so very much appreciated!
I appreciate your help very much. Just bought the Oster Large Convection oven recommended by CR. Very happy so far. Made Digiorno Pizza, twice, and it was great – better than a pizza parlor.
Hi, Thomas and congrats on your new convection oven! Your pizza’s sound delish – I’m glad you’re having so much tasty success with your new toy 🙂
Thanks for stopping by and happy cooking!
very cool (and thorough) experiment!
Thanks so much, Grace! It was a lot of fun, well…except for all of the dirty dishes and pans 🙂
Hi Brie, yes I found the info helpful. My Hamilton Beach counter top oven runs hot and I always use the middle rack and set the temp 25 degrees lower. I don’t preheat a set amount of time, I turn on the oven before starting the recipe. When I’m done mixing, into the oven it goes.
Unless a baked item is totally inedible, I will find a way to use it. On occasion I have tossed mushy tomatoes or something baked that really couldn’t be salvaged out onto the back lawn. The birds and squirrels appreciate my generosity. They also like grapes that are split, too soft or otherwise not fit for human consumption. I’m really picky about stuff like that.
Haha, Susan, I bet you’re a legend amongst the local wildlife!
I’m with you, even not-so-great items are usually still edible. When we’re testing for new recipes I always toss the duds in the freezer, I find my standards are much lower when searching for a late night snack 🙂
If you’ve got a preference for the next “experiment” let me know, we’re totally open to suggestions…
Thanks for stopping by Susan, it’s always nice to hear from you. Have a great weekend!
Lol, I once had a HUGE possum on my front porch staring at me through the storm door. He was waiting to be invited in, probably for a snack. Lucky for him, I don’t eat possum but some of my older neighbors would have been looking for a big enough pot to cook him in.
Animal control came and got him and took him out to the state park to be with his relatives.
So glad I am a city kid!
Human food (baked goods) is really really bad for wild animals! That’s a sure way to kill them faster. Leftover/unused fruit like grapes etc is fine to toss out to wildlife to eat but please don’t kill our wildlife with your deadly baked goods!