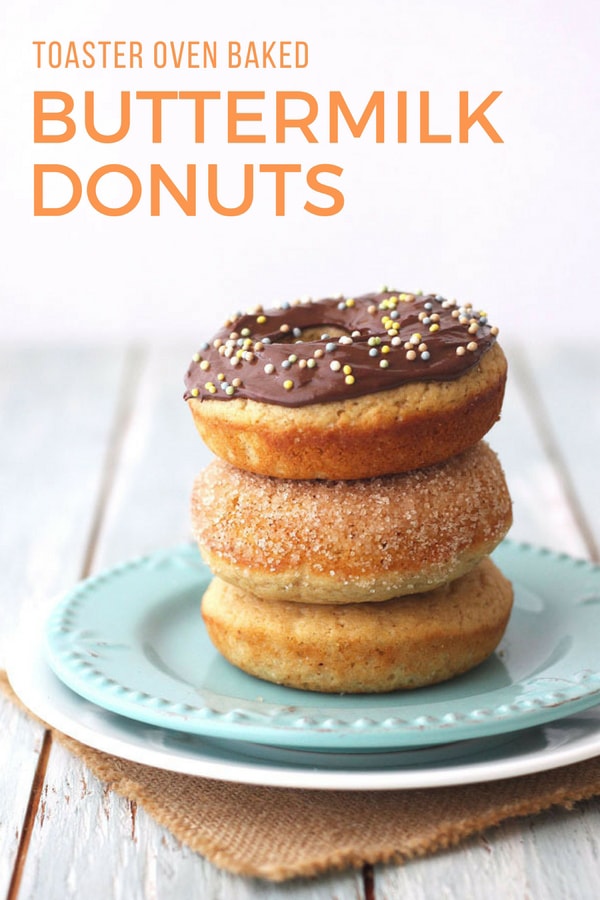
Baked Buttermilk Donuts
These baked buttermilk donuts are sweet and tangy with that unmistakable plain cake donut flavor. Dust off your donut pan and bake a batch today, you’ll love how easy they are to make!
It’s rare to find a recipe that pleases everyone in my family. So getting the thumbs up from all the adults made me feel pretty good about these baked buttermilk donuts.
But they still had to make it past the toughest critic I know: my 4-year-old nephew.
That little dude’s culinary critiques ensure I will always stay humble about my cooking. So when he ate his entire donut AND began negotiating for a bite of Tim’s second donut, I knew this recipe was a keeper.
Flavor-wise, these donuts remind me of a classic plain cake donut.
They have that same lovely combination of warm vanilla, spicy nutmeg, tangy buttermilk and the perfect amount of subtle sugary sweetness.
I’ve made them so many times in the last two months it didn’t seem fair to keep this easy toaster oven recipe all to myself any longer.
Now I know what you’re thinking…can I substitute milk for the buttermilk?
Yesterday while my sister and nephew were visiting we made a batch using whole milk in place of the buttermilk.
The donuts were a touch dry, though that didn’t stop us at all from eating them. So I’d add a tablespoon of unsweetened applesauce or an extra teaspoon or two of oil if you want to make them with regular milk.
~ Keep scrolling for more tips & photos after the recipe ~
Baked Buttermilk Donuts
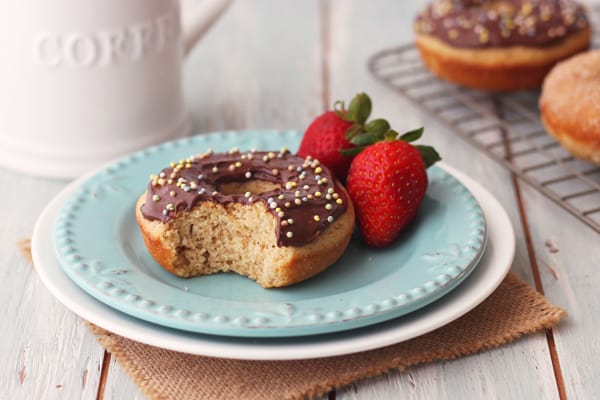
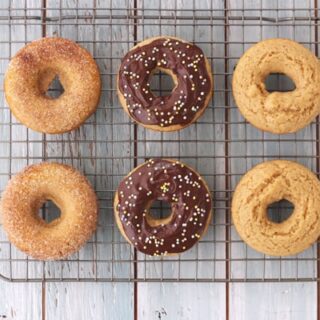
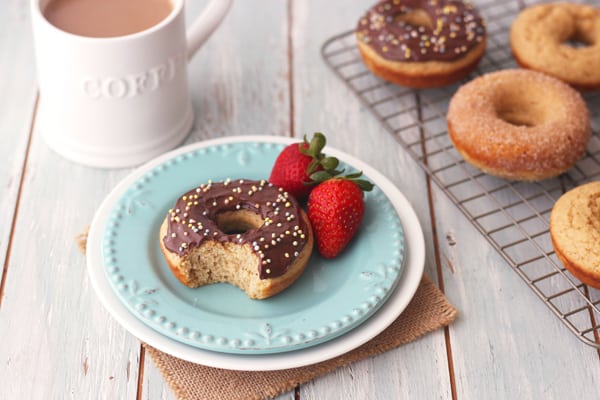
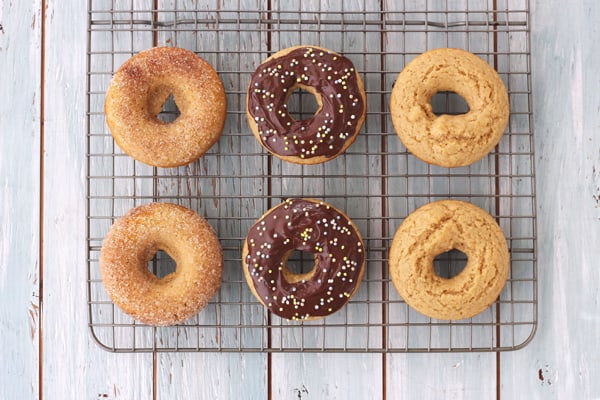
These nutmeg-flavored donuts taste great served plain, coated with cinnamon and sugar, or slathered with chocolate hazelnut spread.
Ingredients
- Cooking Oil Spray
- 1 cup White Whole Wheat Flour or All-Purpose Flour
- 1/4 cup Granulated Sugar
- 3/4 teaspoon Baking Powder
- 1/4 teaspoon Fine Sea Salt
- 1/4 teaspoon Ground Nutmeg
- 1 large Egg
- 1 tablespoon Olive Oil
- 1 tablespoon Honey
- 1/2 cup Low-Fat Buttermilk
- 1 teaspoon Pure Vanilla Extract
Instructions
- Adjust the toaster oven cooking rack to the middle position and preheat to 425°F on the “Bake” setting. Use non-stick cooking spray or oil to coat a 6-cavity donut pan.
- In a medium bowl whisk together the flour, sugar, baking powder, salt, and nutmeg.
- In a small bowl whisk together the egg, oil, honey, buttermilk, and vanilla.
- Add the wet ingredients to the flour mixture and stir just until combined.
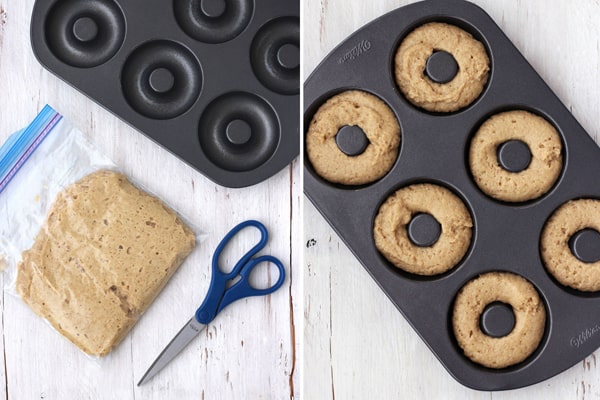
- Scoop batter into a quart-sized plastic bag and cut a bottom corner off. Pipe batter evenly into the prepared pan.
- Bake until the tops of the donuts spring back when pressed and a toothpick inserted into a few comes out clean, about 8 to 9 minutes for full-sized donuts and 5 to 6 minutes for mini donuts. The donuts will be pale on top and lightly golden on the bottom.
- Allow donuts to cool in the pan for 2 to 3 minutes before turning them out onto a cooling rack and topping if desired.
Notes
To bake in a Convection Toaster Oven, reduce temperature to 350°F and bake 8 to 9 minutes for full-sized donuts and 5 to 6 minutes for mini donuts.
Toppings
- For Cinnamon Sugar Topped Donuts: In a small bowl melt 1 tablespoon of butter or coconut oil. In another small bowl combine 2 tablespoons granulated sugar and 1/4 teaspoon cinnamon. Dip each donut into the melted butter and then the cinnamon sugar.
- For Chocolate Frosted Donuts: Use 2 to 3 teaspoons of chocolate hazelnut spread to frost each donut, top with sprinkles or chopped nuts.
Storage
The donuts are best enjoyed the day they are baked. Un-topped leftovers can be frozen for up to 2 months.
Nutrition Information:
Yield: 6 Serving Size: 1 donutAmount Per Serving: Calories: 152Total Fat: 3.7gSaturated Fat: 0.7gCholesterol: 32mgSodium: 112mgCarbohydrates: 26.7gFiber: 2gSugar: 13gProtein: 4.4g
Toaster Oven Baking Tips
- Use the middle rack position, if you can. It’s perfect for cooking baked goods like muffins, chocolate chip pecan oatmeal cookies, and donuts.
- If you’re cooking with a convection toaster oven, turn the temperature down, WAY DOWN. We tried this recipe using the convection fan on our larger countertop oven at 400°F and 375°F. Both temperatures yielded dry donuts even with a shortened cooking time. At 350°F with convection, the donuts were soft and delicious.
Step by Step Photos
To make this recipe you’ll need a 6-cavity donut pan or a mini donut pan (the mini is nice for smaller toaster ovens).
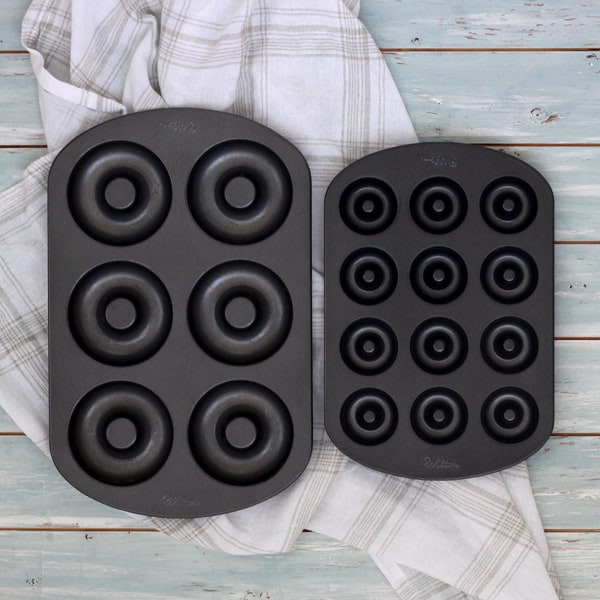
We’ve included baking instructions for both sizes in the recipe. I’ve tried this recipe using other pans and unfortunately, it doesn’t turn out the same.
Step 1: Grease Your Donut Pan Well
If your pan is like mine and has seen better days use the cooking spray that has flour in it. That stuff will keep anything from sticking.
Step 2: Measure Out Your Flour
In my experience, this is where baked donuts can go bad (aka DRY). Especially when using whole grain flour.
To keep from compacting the flour and adding too much to the batter lightly spoon your flour into the measuring cup and then level off the top with the back of a butter knife.
Step 3: Mix It All Together
Add the liquid ingredients to the dry ingredients, stirring just until combined. Too much stirring and your donuts will be tough.
Also, expect the batter to be on the thicker side.
Step 4: Pipe Your Batter
Transfer the batter to a plastic bag and snip off one of the corners. Then pipe it into your prepared pan. A reusable pastry bag without a tip works well too.
Step 5: Bake, Top, and Eat
Pop the donuts in your toaster oven but don’t wander off, they bake up quickly.
Instead, use that time to decide how many you should dip in butter and cinnamon sugar, cover with chocolate hazelnut spread and sprinkles, or just enjoy plain!
I tried these. Followed the recipe to the tee. I used my convection. 350 for 10 minutes. Had to continue cooking because they were rubbery. Not cooking in the middle. Dense and doughy. Another ten minutes and the bottom was barely brown and the texture was more like a bagel. Felt bad not eatable. Can’t decide what I did wrong.
Hi Linda,
I’m sorry the donuts didn’t turn out for you, I’m sure that was really disappointing.
Is there a chance you might have overmixed the batter? Or used a hand mixer?
The more the batter is mixed once the wet and dry ingredients are combined the more the gluten will develop creating a hard and dense closed texture instead of a lighter and airy texture.
For quick bread recipes like this, I try and mix the flour just until it is incorporated. It’s okay if the batter is a little lumpy. While a smooth batter feels right it will usually mean a denser and rubbery bread.
For what it’s worth, I did retest the recipe this morning baking the donuts in a metal pan at 350F with the convection fan on. I got a clean toothpick after 9 minutes. The donuts were fluffy inside and lightly crisped outside but the bottoms did not have as much color as the donuts pictured in the post – those were baked at 425F without convection.
If you want to send me an email I’d be happy to compare ingredients and ovens to troubleshoot the recipe more.
Either way thanks for stopping by and for leaving a comment 🙂
Hi Brie,
I am doing a cooking project with my junior high math class to practice math in the real world using cooking conversions, percentages, grocery budget planning, etc. using your recipe since it’ll be easy enough for me to bring a toaster oven into the classroom. Thank you so much for posting this! I am excited to see how this all turns out with my class! The student work packet I am making is turning out really cool and I would like to be able to make it available for purchase on Teachers Pay Teachers. Do I have your permission to use your ingredient ratios and cooking steps in this educational resource? I can send you a copy of what I did if you would like.
Blessings,
Meghan Jacobsen
Hi Meghan,
That sounds really cool!
I do have a few questions about the info you’re asking to use, would you mind sending me an email at hello[at]toasterovenlove.com so we can chat real quick.
Your resource sounds fantastic – I just want to make sure I’m not confused or misunderstanding anything 🙂
I tried this recipe for my first baking experience. I was able to follow the recipe and then proceeded to eat ten of them as soon as they came out of the oven. Safe to say this recipe is wonderful. Well done!
Jack, I’m so glad to hear the donuts were a success and that you enjoyed them!
Those mini one’s are little dangerous to my waistline :), they’re way too poppable!
Hi
We have a small toaster oven with no middle rack. Do you think this will be a problem? Also, if I use a regular oven, do you think there should be any adjustments as to time and temperature?
Thanks!
Sue
Hi Sue!
Our smallest toaster oven only has top and bottom rack positions too. I’ve baked the mini donuts on the bottom rack without a problem.
We haven’t baked these in our regular oven (yet) but it should be about the same. To be on the safe side I’d check on them around the 7-minute mark and then add more time as needed just in case your oven runs a little warmer than our toaster ovens. Better to have to bake them longer than to have them burn 🙂
Happy cooking!
Brie
Thanks Brie! ??
Can you use silicone donut pans in the toaster oven . Non convection. The regular pans are too big for my toaster oven.
Hi Linda!
Unfortunately, I can’t speak to the safety/performance of silicone pans since we’ve only tried the individual baking cups once and any manufacturer we’ve reached out to has either said they didn’t know or that their pans worked best in a regular oven. Maybe others who’ve used silicone baking pans will chime in?
If you found a pan you liked that had dimensions that fit, your best bet would be to email the manufacturer and ask.
I will say the mini metal donut pan is pretty small, these are the dimensions according to Amazon (10.4 x 7.8 x 0.8 inches). The large one doesn’t fit in our little Oster but I have used the mini donut pan in it without a problem.
I have a set of full size (four- 4 inch diameter donuts per pan) silicone pans and baked one batch in my new amazing Cuisinart Chefs convection oven. I added a pinch of allspice with the nutmeg. Yield was 3 donuts. Delicious! I think a glaze is needed but am eating my donuts plain. First try at baking donuts. Chocolate cake donuts are next on the list. Thanks for this tasty recipe!
Yay, I’m so glad you enjoyed the donuts, Eli!
Allspice sounds like a great addition to the nutmeg, I can’t wait to add some to our next batch.
Thanks for trying the recipe and taking the time to come back and share how things worked out using silicone pans, it’s super helpful.
I hope you have lots of fun cooking with your new oven!