Instant Pot Mini Oatmeal For Two
Comforting and filling, nothing beats a warm bowl of oatmeal for breakfast. The 3 Quart Instant Pot Mini makes it easy to whip up a batch of oatmeal for two, especially on busy weekdays!

If you’ve never cooked oatmeal in an Instant Pot you’re probably wondering, does the oatmeal cook faster?
I won’t leave you in suspense. It does not.
- First, you need about 2 minutes to pull your ingredients together.
- Then your machine needs about 10 minutes to build pressure.
- There’s 1 minute of actual cook time.
- Lastly, 15 minutes of letting the pressure release naturally.
The whole cooking process for our go-to recipe takes about 28 minutes in total.
So why would you use an instant pot instead of the stovetop?
It’s almost all HANDS-OFF.
You don’t need to stir a pot or keep an eye on it. You just set a timer and then get on with the rest of your morning routine.
26 minutes later you smell better, look presentable, and there’s a pot of perfectly cooked oatmeal waiting to be topped and devoured!
Customizing Your Oatmeal
To come up with this creamy Instant Pot Mini Oatmeal for Two, we resized and tried a bunch of larger recipes, kept the best parts of each one, and added our own special touches (lemon extract is a game-changer friend).
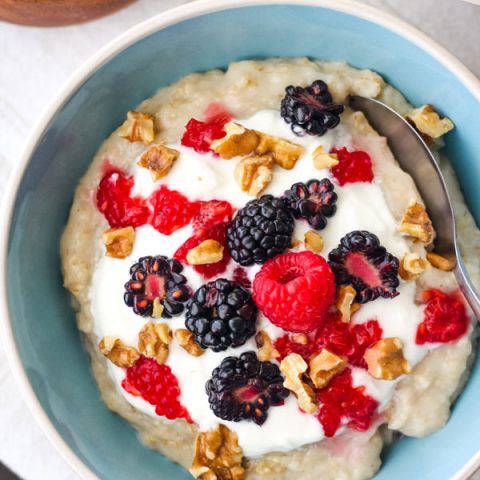
If you like sweet oatmeal, drizzle on honey or maple syrup. From berries and yogurt to bananas and peanut butter, the topping possibilities are endless!
~ Keep scrolling for step by step photos & instant pot mini tips after the recipe ~
Instant Pot Mini Oatmeal For Two
An easy oatmeal for two recipe made in the 3 Quart Instant Pot Mini Duo Plus
Ingredients
- 1 cup Old-Fashioned Oats
- 2 cups Water
Instructions
- Combine the oats and water in the inner pot of your 3 qt Instant Pot.
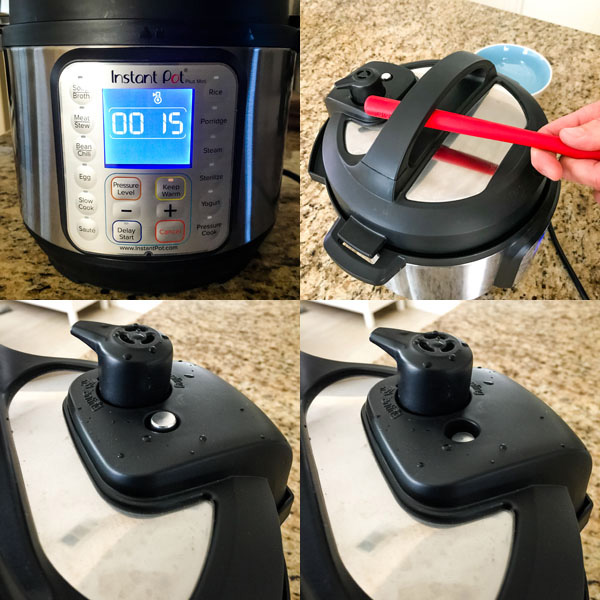
- Close and lock the lid. Make sure the steam release handle is pointed towards the Sealing position.
- Select the Pressure Cook or Manual button and adjust the settings to cook on High Pressure for 1 minute.
- When the cooking time is up, wait for 15 minutes. If the float valve has not dropped down, manually release the pressure.
- Carefully open the lid turning it away from you as you lift it up.
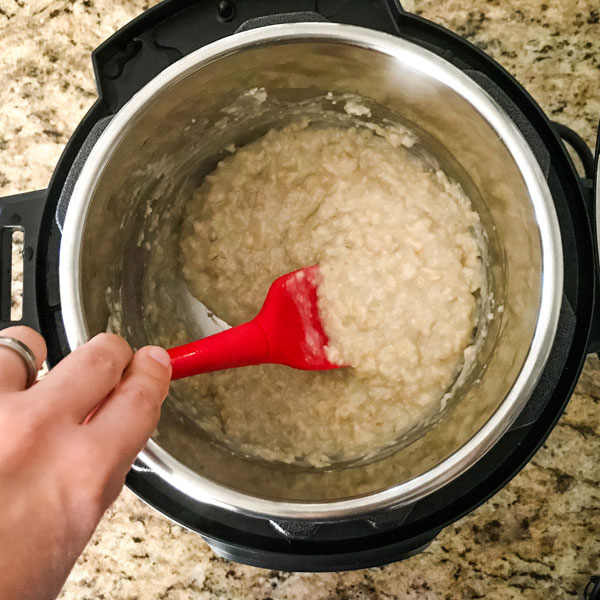
- There will be a small layer of liquid on top. Stir the contents to incorporate it into the oatmeal.
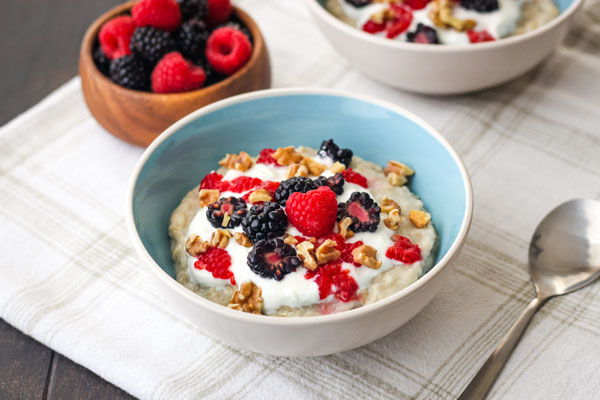
- Serve warm with your favorite berries, yogurt, cinnamon, and sweetener if desired.
Notes
Recipe developed using a 3 Quart Instant Pot Mini Duo Plus.
Oatmeal Flavoring Recommendations: Try adding a splash (about ⅛ teaspoon) of lemon or vanilla extract to the water before cooking. A 1/4 teaspoon of ground cinnamon with almond extract is a nice combo too.
Nutrition Information:
Yield: 2 Serving Size: 1 Bowl of Plain OatmealAmount Per Serving: Calories: 150Total Fat: 3gSaturated Fat: 0,5gSodium: 0mgCarbohydrates: 27gFiber: 4gSugar: 1gProtein: 5g
How to Make Oatmeal for Two in your Instant Pot Mini
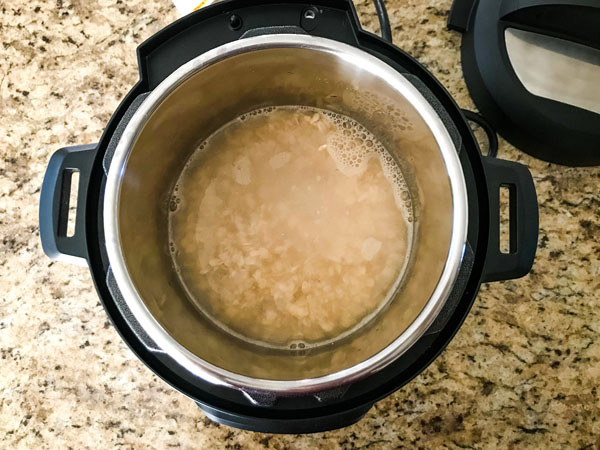
Start by combining 2 cups of water and 1 cup of old-fashioned oats (not steel cut) in the inner pot of your 3 qt Instant Pot.
Quick Note: I wouldn’t suggest doubling this recipe.
According to the manual, beans and grains create a lot of foam when pressure cooked. You should only fill your pot HALFWAY with ingredients when cooking them. (source)
Also, we haven’t attempted making other types of oats yet but the steel cut variety is definitely on our to-try list.
Pressure Cook Your Oatmeal
Once you’ve got your ingredients in the pot, close and lock the lid. The machine will sing you a little tune to let you know when the lid is locked in place.
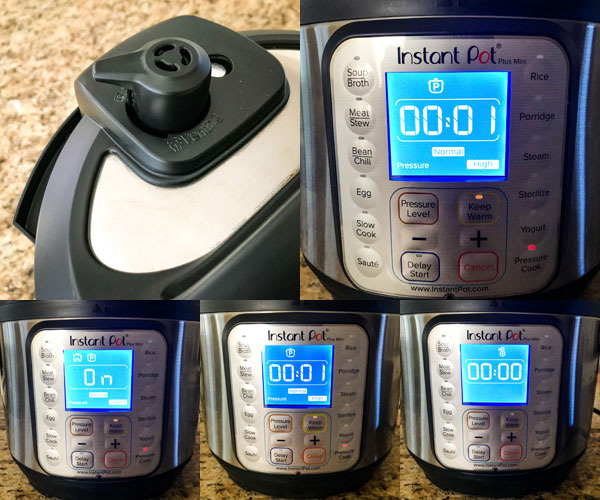
- Make sure the steam release handle is pointed in the Sealing position, i.e. towards the back of the Instant Pot.
- Select the Pressure Cook button (on your machine this might be the Manual button).
- Adjust the settings to cook on High Pressure for 1 minute. A few seconds after adjusting the settings the machine will start to heat up and build pressure.
- Now’s a good time to set a timer for 26 minutes and go get ready for the day.
- Once the machine reaches pressure (our 3 qt Instant Pot Duo Plus usually takes about 10 minutes) it will beep and begin cooking for the set time, in this case just 1 minute.
- When the cooking time is up the machine will beep again and the screen will display zero time left.
- Don’t do anything yet.
Instead, wait for 15 minutes.
Then use a long-handled spoon or tongs to carefully turn the steam release handle and wait for the float valve (silver pin thing) to drop down.
Pay Attention During The Quick Release
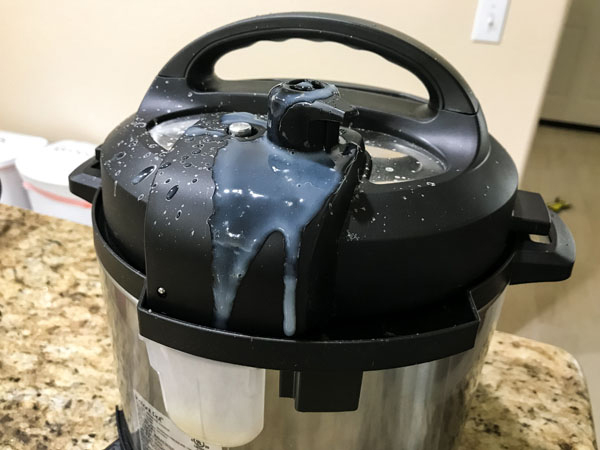
If anything but steam starts coming out of the valve – turn it back to the sealing position immediately!
One morning in a sleepy fog I accidentally added 3 cups of water instead of 2. When we turned the steam release a starchy oatmeal mixture started spraying ALL over the machine.
A week later, I was still discovering little spots of dried oatmeal paste in our kitchen.
Unfortunately, the photo above is from the second time this happened when Tim added too much water. Maybe we should stick to just making coffee before we’re fully awake? 🙂
After The Pressure Releases
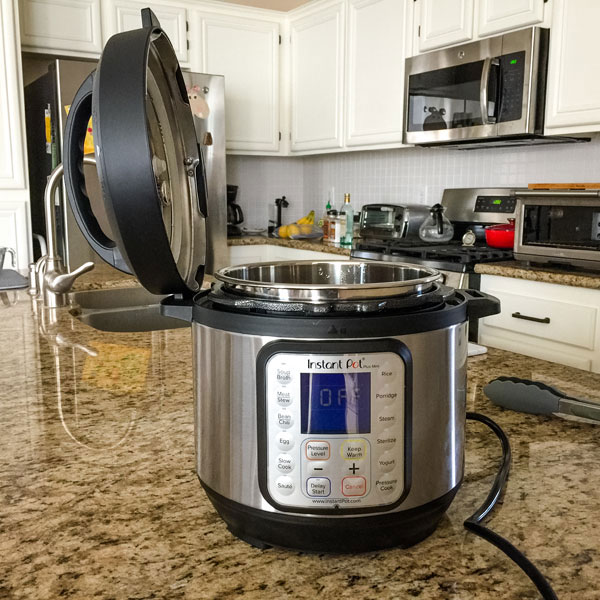
Press “Cancel” to turn off the machine.
Carefully open the lid and turn it away from you as you lift it up. I like to stick the lid in the nifty handle on the side of the machine.
When you look inside is there a small layer of water on top?
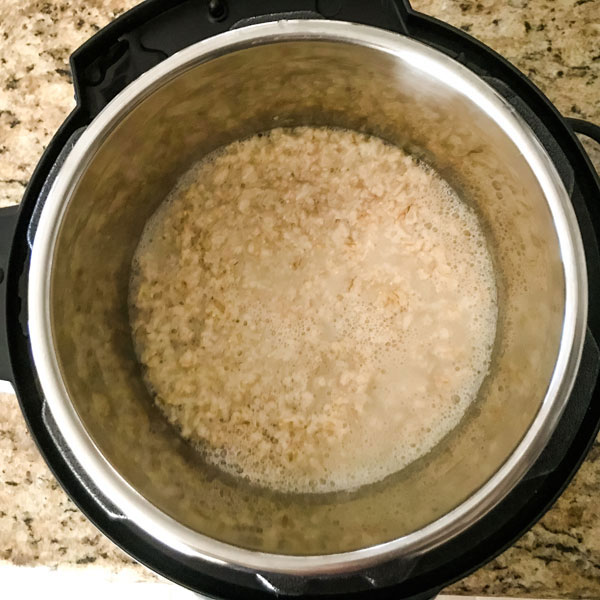
Don’t panic, it’s totally normal and you haven’t done anything wrong.
Give the pot a good stir and the water will incorporate into the oatmeal.
We like to leave our oatmeal in the pot for a few minutes while we get the yogurt and toppings ready. It usually needs another good stir as the oatmeal does get thicker while it sits.
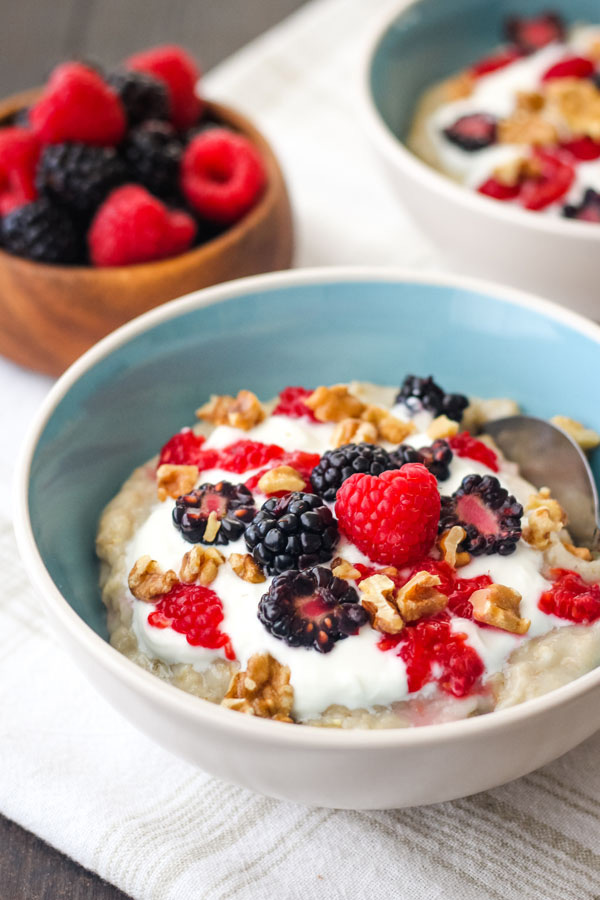
Lastly, transfer the oatmeal to two bowls and top with berries and yogurt.
We’re a plain oatmeal house but you can add any sweetener to yours that you want. A drizzle of maple syrup or honey would be delish!
When do you add salt – before or after cooking?
Hi Sherry,
If you want to add a pinch of salt, I would stir it in before cooking the oats.
i thunk i followed the directions…but just as the min. timer went off I got a ‘Burn’ message….hurried and let thesteam off once cooled I opened the lid ..while there was a bunch stuck to thebottom…the top portion tasted ok….just a bit mess nd wasted some oatmeal. suggestions?.
Well, darn that’s no good. I’m sorry to hear your oatmeal didn’t turn out as expected, Lois.
We still use these directions to make oatmeal every day in our 3 quart instant pot. Aside from the sealing ring issue I noted in the comments below, we haven’t run into any other problems. I’m truly stumped as to why this method seems to work fine for some and not so great for others.
I’d start by checking the sealing ring for cracks. If everything looks good, then I’d try making the recipe in a 3 Quart Instant Pot using the Low-Pressure setting. According to this Kitchn article (https://www.thekitchn.com/when-to-use-high-or-low-pressure-on-the-instant-pot-236432), the low pressure setting translates to a lower temperature. So you may need to increase the cooking time but I’d use the 1 minute time to start.
One other thing to consider, if you plan on making a lot of grains in your IP, I’ve found it’s worth getting the ceramic coated insert. We’ve yet to get a burn notice using it to cook any starchy grain and it’s very easy to clean.
Hope that gave you a few ideas and best wishes for fewer burn notices 🙂
Cook the oatmeal in a separate bowl. This is called pot-in-pot cooking, and it’s the most fool-proof, no burn, for cooking old-fashioned or quick cooking rolled oats. It’s also the method you should use if you want to cook a smaller portion of oats. 3 cups oatmeal is max.
Pot-in-pot method:
Add equal amounts of dry rolled oats and water (or milk) to glass bowl.
Pour 1- 2 cups water into the inner stainless steel pot, and add the trivet; place the glass bowl on top of the trivet using a make-it-yourself leave-it aluminum foil sling.
Place the lid on, lock and seal, and cook at manual high pressure for 10 minutes (can’t over cook oatmeal).
Allow the pot to do a full natural pressure release, then
release any remaining pressure, open the lid and lift out the glass bowl with the aluminum foil sling.
Question from newbie: why wouldn’t you just press the porridge button and reduce pressure to LESS? I’m confused because the button would set it for 20 mins….does that include wait and release time? So far no recipe I’ve seen tells you to simply press the pre programmed buttons! Lol! Yes, I know porridge is slightly different than old fashioned oatmeal. Thx!
Hi Robin!
I don’t know if all Instant Pots work like ours does but on the 3-Quart Instant Pot Duo Plus the timer does not include the release time – it’s ONLY the pressure cook time. So if you used the proridge button you would be telling the machine to cook your oatmeal under pressure for 20 minutes.
For the most part, the preprogrammed buttons are just suggested or estimated best time/pressure settings. I’m not a big fan of those because they can’t take into account the specific ingredients you’re actually cooking with. Take the Egg preset, according to the manual it’s time and pressure settings are for cooking XL eggs.
Hope that helped and happy cooking with your Instant Pot 🙂
I used the porridge setting and had a thick layer of oatmeal on the bottom that took me a long time to clean. I used the above method and had great success.
Another thing I did was spray the pot with PAM.
In the past I’ve been using a double boiler and cleanup has been cumbersome.
The main reason I bought an instant pot is because I want to cut both stovetop and oven time to avoid heating up the house in the summer. Using the IPMini for oatmeal helped a great deal.
Thank you LL for taking the time to share your experience with the different settings and the PAM tip!
I top mine with a sprinkle of Bob’s Red Mill Paleo Muesli with unsweetened, unsulphured coconut flakes with blueberries, cranberries, currants and strawberries with macadamia nuts, almonds, cashews, sunflower and pumpkin seeds. 🙂 Sometimes, I drizzle a bit of local wildflower honey. Love my oatmeal!
Oh, Karen, that sounds so delicious! No wonder you love it 🙂 I can just imagine all the different textures, it’s like a trail mix oatmeal AND with a drizzle of honey, swoon!
I like oatmeal SOOOO much that I often eat it with just a pat of butter (I’m loosely following a keto diet), and two poached eggs, which I cook in the micro. Such a good, filling, down-to-earth meal, and quite frankly, I like oatmeal so much that what most people consider to be two servings is only one hearty serving for just me and my eggs :-). Cooking the oats in the IP (my brands is Yedi, from Yedi Housewares) is super easy, and since I’m retired, I have no time constraints for when it needs to be ready, so I just do other things during the time it’s in the pot, and enjoy it when it’s ready.
Ooooh, a pat of salty sweet butter + oatmeal sounds delicious! Thanks for the tasty tip, Joyce 🙂
The first time I made this it was fantastic and I love it!! Every time since even though I’m doing the exact same thing, I get the burn error. Have any advice or wisdom about this???
Hi Lynsey,
I’m sorry you’re having trouble with the recipe. That burn notice is so frustrating since it doesn’t tell you why the heck it burned, it just leaves you with a mess to scrape off the bottom of your pot.
One thing it might be is the sealing ring.
We still make this oatmeal almost daily. About 5 months ago I got the burn notice 3 days in a row.
I stood nearby one day while it was building pressure and could see a little moisture on the front corner of the lid where it was letting steam out. When I took the lid off (after it was done cooking) I could see the ring was sitting just the slightest bit askew and was not totally in place.
To fix it, we started making sure the ring was in really good and that you could spin it around before putting the lid on.
That worked for a few weeks but then we got the burn notice again. It seemed like the ring was a little stretched out so I bought a new sealing ring and we haven’t had a problem since.
This post from Pressure Cook Recipes has some good burn error tips: https://www.pressurecookrecipes.com/instant-pot-burn/. Mistake #6 breaks down the sealing ring issue we had.