Instant Pot Mini Hard Boiled Eggs
Instant Pot Mini Hard Boiled Eggs are the perfect beginner recipe to learn how to use your new multi-cooker. The easy-to-peel eggs are great as a quick high-protein snack or for making egg salad.
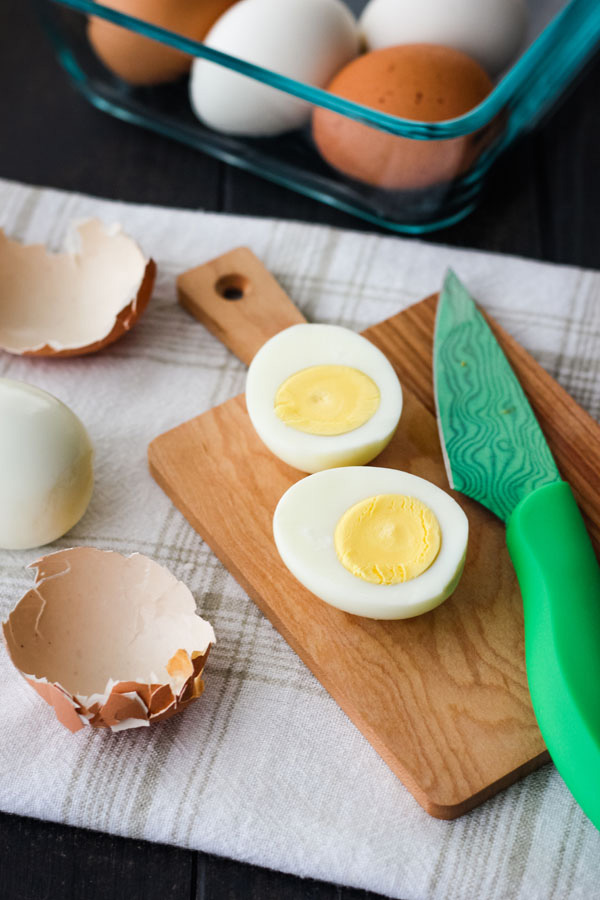
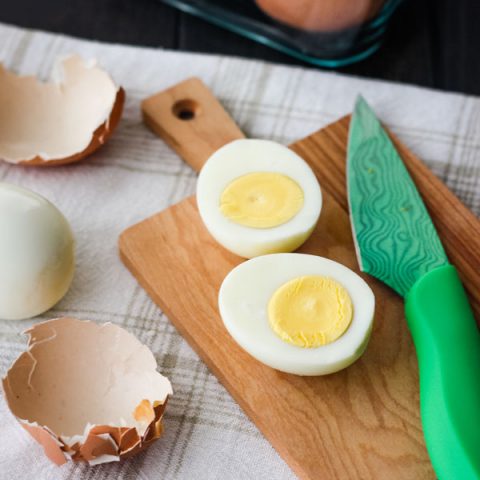
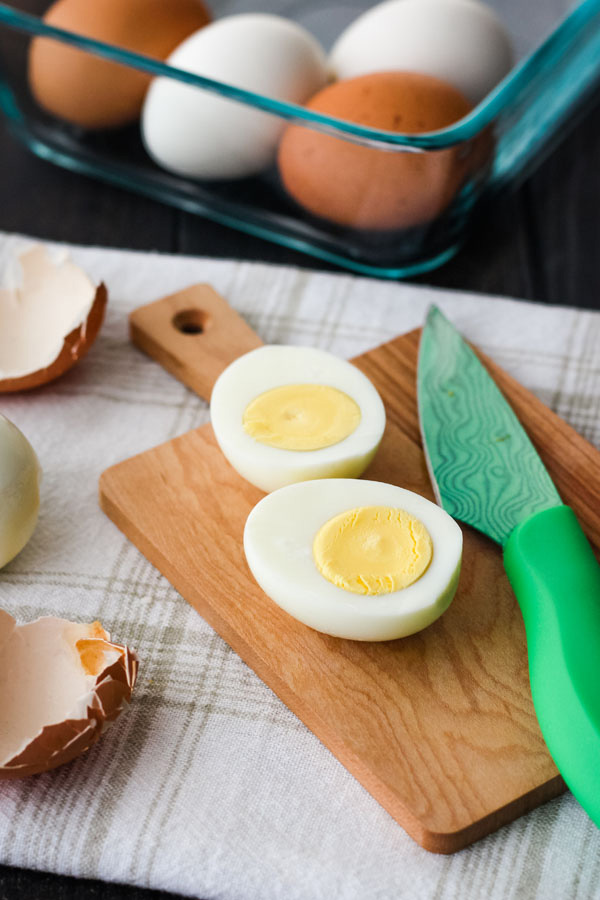
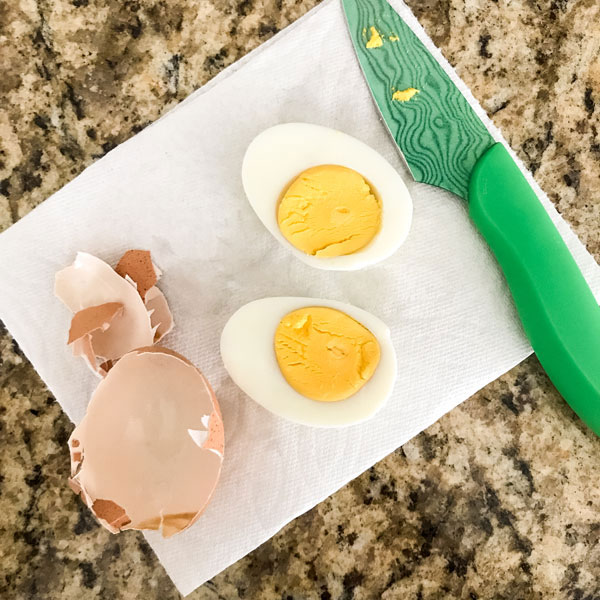
The secret to a good Sriracha Egg Salad Sandwich starts with good hard-boiled eggs. I’m talking creamy yolks (with no grey in sight) and easy to peel shells.
If you’ve struggled with achieving these results using the traditional stovetop method you’ve got to give it a try in your 3 quart instant pot mini.
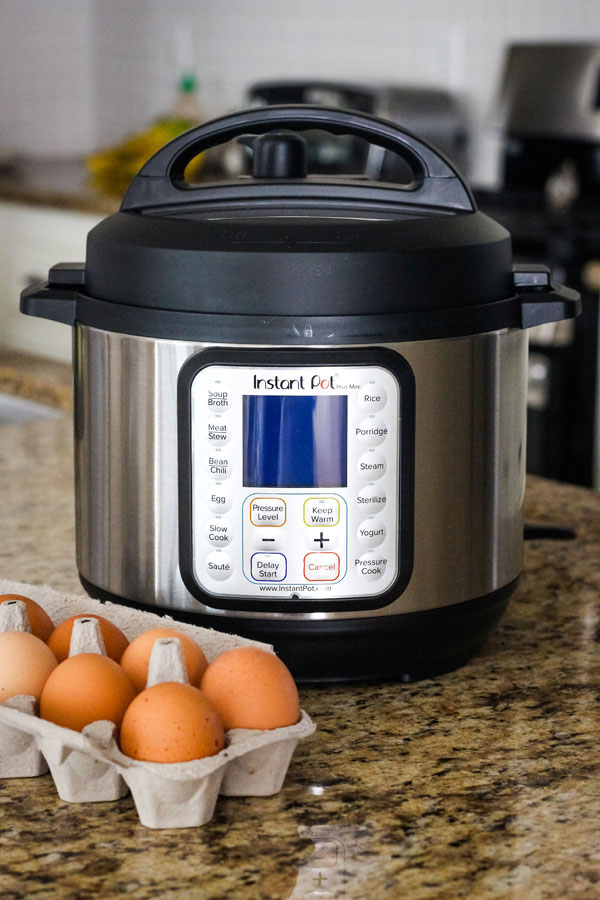
Last year we added a new member to our small appliance family, a 3-quart Instant Pot Duo Plus Mini.
After reading the manual we couldn’t wait to cook something with it and settled on a batch of hard-boiled eggs.

Looking online and in the IP Books I’d checked out of the library I found about 100 different methods.
The most popular is something called the 5-5-5 Method.
- You cook the eggs on High Pressure for 5 minutes
- Let them naturally release for 5 minutes
- Then carefully quick release the remaining steam
- And dunk the eggs in an ice bath for 5 minutes
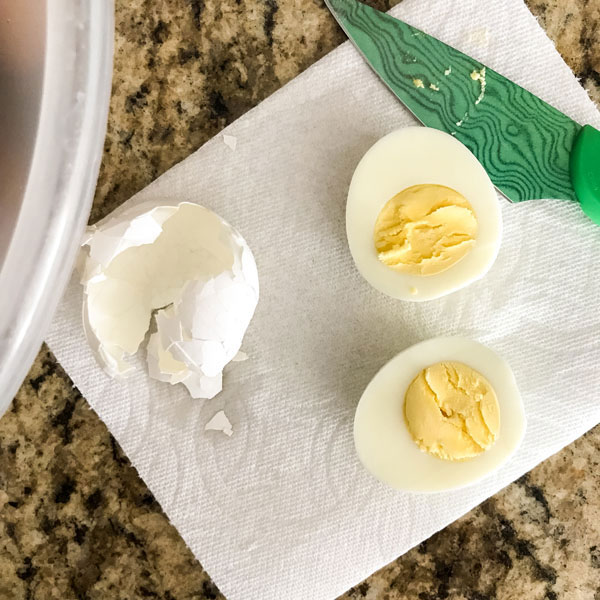
We gave it a try using 2 eggs and ended up with overcooked grey yolks and cracked egg shells.
Skimming through the 5-Ingredient Vegetarian Pressure Cooker Cookbook, I noticed the author had a different version that used LOW pressure for 6 minutes followed by a quick release.
So I grabbed 2 more eggs and gave it a try. The whites were perfect but the yolks were a tiny bit overdone.
On the next batch, I kept the pressure low but reduced the time to 5 minutes. This time, the eggs were perfect.
For any method/time combination, I’d suggest cooking just one or two eggs the first time you try it.
~ Keep scrolling for step by step photos & instant pot mini egg tips after the recipe ~
Instant Pot Mini Hard Boiled Eggs
Make perfect easy-to-peel hard cooked eggs in just 25 minutes!
Ingredients
- 1 cup Water
- 6 Large Eggs* (see note)
Instructions
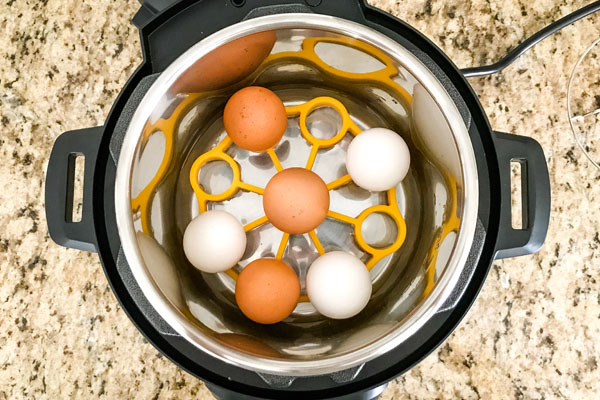
- Pour the water into the inner pot of your 3 qt Instant Pot.
- Place the rack that came with your pressure cooker in the bottom of the pot and arrange your eggs on top of it.
- Close and lock the lid. Make sure the steam release handle is pointed toward the Sealing position.
- Select the Pressure Cook or Manual button and adjust the settings to cook on LOW Pressure for 5 minutes
- When the cooking time is up, manually release the pressure using a Quick Release.
- Once the float valve has dropped down, carefully open the lid turning it away from you as you lift it up.
- Remove the eggs and place in a bowl of ice cold water for at least 5 minutes.
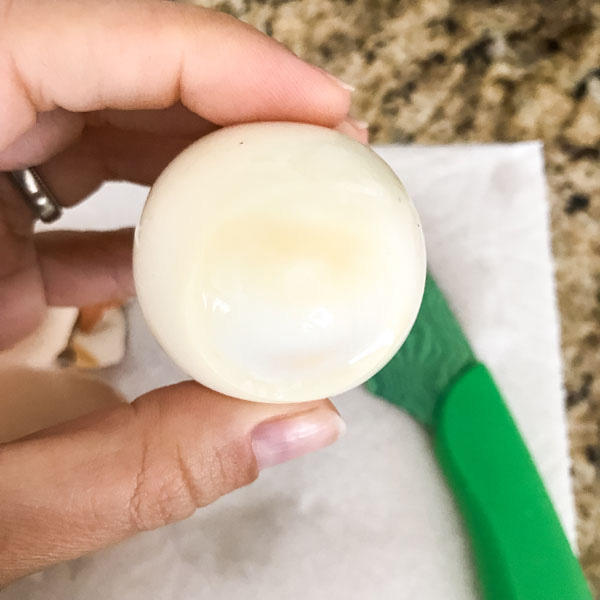
- Peel and enjoy right away or store in your fridge for up to one week.
Notes
As eggs and machines vary, we recommend cooking just one or two eggs the first time. Then you can make adjustments to the cooking time as needed for your specific eggs.
Method developed using Large US Eggs (weighing about 2 ounces or 56 to 57 grams each) and a 3 Quart Instant Pot Duo Plus.
If your Instant Pot is larger, we'd recommend using a method specifically designed for it as we have not tried this method in any other models and have no way of knowing if it would work or not.
Nutrition Information:
Yield: 6 Serving Size: 1 Hard Boiled EggAmount Per Serving: Calories: 72Total Fat: 5gSaturated Fat: 1.6gCholesterol: 186mgSodium: 70mgCarbohydrates: 0.4gFiber: 0gSugar: 0.4gProtein: 6.3g
How to Make Instant Pot Mini Hard-Cooked Eggs
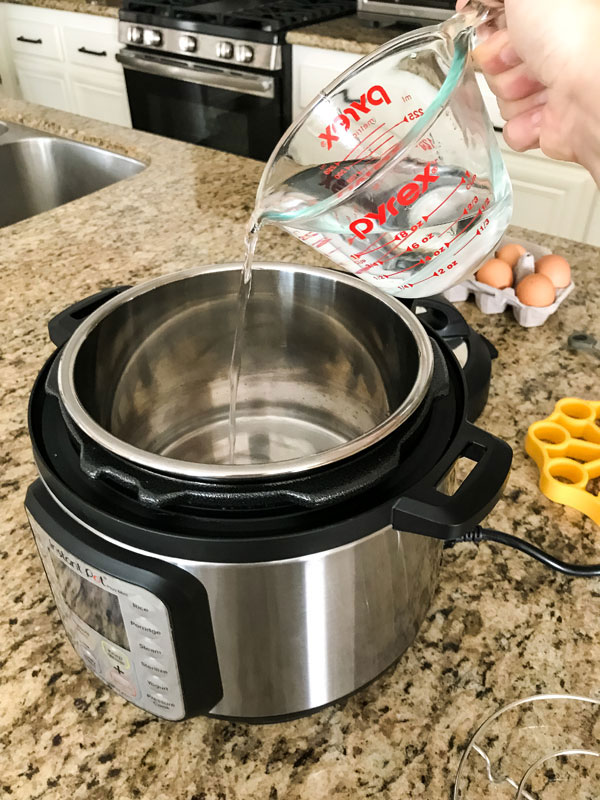
Start by pouring 1 cup of water into the bottom of your 3 quart Instant Pot.
Next, place a rack in the bottom.
The other day, I found a nifty OXO Silicone Egg Holder in the discount section at our local Ralph’s. I don’t know about you but the Manager’s Special area is just irresistible!
Related: Instant Pot Mini Accessories (What To Get & What To Skip)
I really like how it keeps the eggs from rolling around and have used it when cooking other rolly-polly shaped things like these instant pot mini beets.
You can also use the metal rack that came with your mini pressure cooker. We’ve cooked with both and have not had any problems.
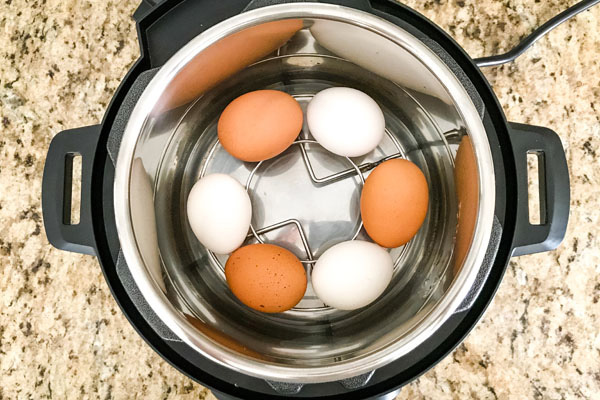
Once you’ve got your rack in place put the eggs on top of it.
Turn the top vent knob towards the Sealing position. Then place the lid on top and turn it to lock your pressure cooker.
Listen for a beep that will tell you the lid is properly in place.
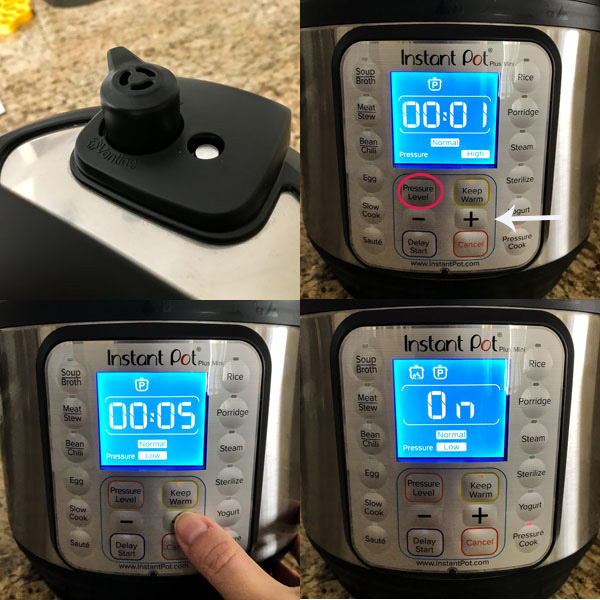
- Press the manual or pressure button.
- Adjust the pressure to low by pressing the “Pressure Level” button.
- Use the minus/plus (- +) buttons to set the time for 5 minutes.
- Wait for a few seconds, it will beep, the screen will switch to read “On” and the machine will begin cooking.
It usually takes about 10 minutes for our 3 quart instant pot to come to pressure when cooking eggs this way.
While the eggs are cooking fill a bowl with ice and water.
The machine will beep once it reaches pressure and will start counting down the time on its screen.
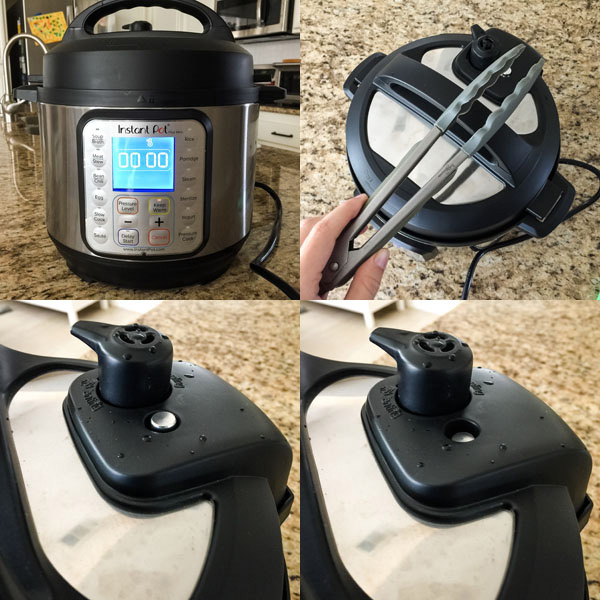
Once it’s finished cooking, it will beep again and the screen will have zero minutes on it.
Carefully “quick release” the steam by using tongs to turn the vent knob into the venting position. Watch out for the escaping steam.
When the metal thing (technically called a float valve) goes down press cancel to turn off the machine.

Then carefully remove the lid and place it in the holder on the side of the machine if you want.
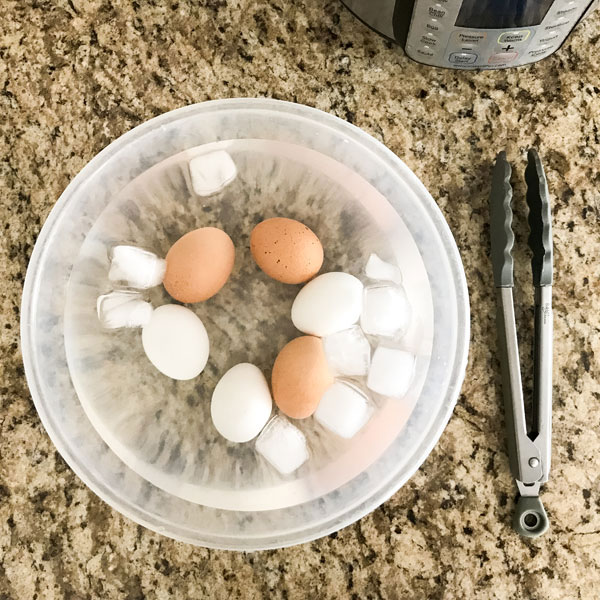
Use tongs to transfer the eggs to the bowl of ice water and let them sit in the ice water for at least 5 minutes.
Peel and enjoy right away or store in your fridge for up to one week.
I know what you’re thinking now because I was wondering the same thing…
Can you make a dozen eggs in an Instant Pot Mini?
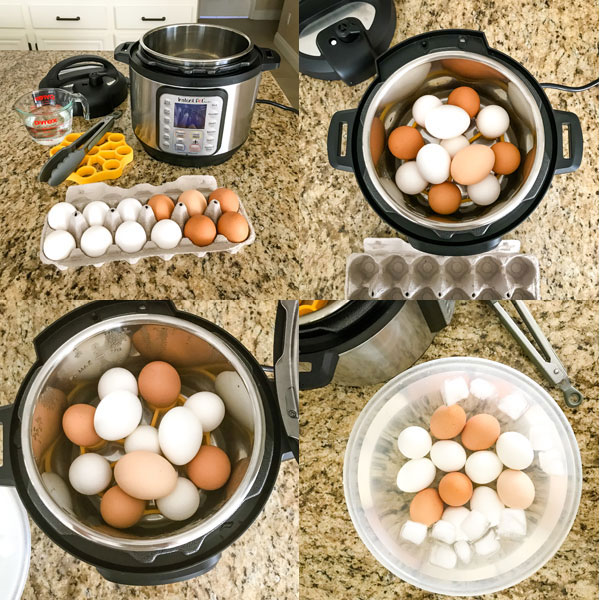
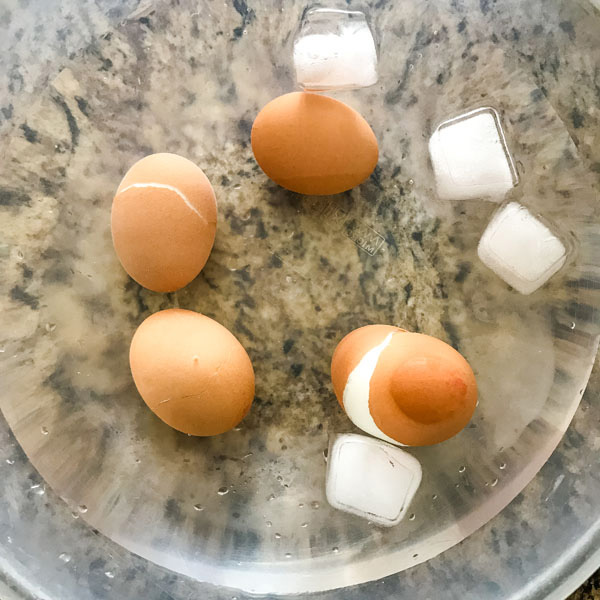
Curious, we poured 1 cup of water into our 3 Quart Instant Pot Duo Plus, added a rack, and piled 12 large eggs on top of each other.
I had to move a few of the eggs around so the pile was under the Max Fill Line on the inside of the pot.
Keeping everything the same as the recipe above, we cooked them on Low Pressure for 5 minutes, used a Quick Release, and chilled the eggs in ice water for at least 5 minutes.
Note: The machine did take more time to come to pressure, about 13 minutes.
The results: 2 eggs had small cracks and a few of the eggs that were closer to the bottom of the pot had a light brown area on the whites from the shells.
Otherwise, they were delicious and incredibly easy to peel!
One Last Tip
Make sure your pot is cool and that you are using cool (not hot) water, otherwise your eggs will crack and be overcooked.
This happened to a batch we cooked when the pot was still warm from cooking another recipe.
Using hot water or a hot pot will mess with the cooking time and you’ll be disappointed with the results – so be cool 😉
Hi, just found your site and am exploring your IP Mini recipes. Will be trying this hard-boiled egg recipe. Was wondering if you were familiar with the egg loaf for those recipes where you wanted to chop up the eggs for recipes like egg salad, potato salad, etc. ? I have been successful down to three eggs in my Duo Plus Mini. Here is the link to the original recipe, if you want to try it – EGG LOAF IN THE IP
If you need several chopped hard-boiled eggs for egg salad, potato salad, etc. you might want to make an egg loaf – https://www.simplyhappyfoodie.com/instant-pot-egg-loaf/. I’ve used this recipe in my Mini, with as few as 3 eggs.
Thanks for sharing your Mini recipes!
Hi Kaye!
Thanks for your sharing about the egg loaf and how many eggs you use in your mini. It’s a neat idea for salads though I’m sure my husband would be happy to just eat the whole thing 🙂
I love your recipe for the eggs when I tried it the eggs yokes was still runny. So I guess I needed to go to 6 minutes.
Hi Debbie, I’m sorry you had issues with the eggs. You might want to try increasing the cooking time to 6 or 7 minutes.
Also, the 5-5-5 method we mention at the beginning of the post is another option. You cook the eggs on High Pressure for 5 minutes, naturally release for 5 minutes, quickly release the remaining steam, and dunk the eggs in an ice bath for 5 minutes. It might work better for your machine/eggs.
Either way, I’d try cooking just one or two eggs until you nail down your preferred method.
Thanks for leaving a comment and fingers crossed your yolks are solid on the next batch!
Hi Brie,
sorry for the stupid question, but did you pierce the eggs? I’m afraid, that the will explode otherwise.
Hi Denise,
That’s not a stupid question at all.
You don’t need to pierce the eggs, just put them in whole. I’ve never had one explode, I did have one crack but that time the pot was still warm from another recipe.
Good luck and please know you can always ask questions here – you never know who else has the same one 🙂
P.S. from Addie: there’s steam coming through the vent even though it’s set on “sealing” -is that right?
A little bit might come out of the vent during cooking (sometimes more if you’re making small amounts).
The steam used to really stress me out, this video from Instant Pot about when steam might leak is super helpful https://www.youtube.com/watch?v=Jw5wwBpb8Uc.
Hello – my Instant Pot Mini Duo looks smaller than yours, and I don’t have an “egg” setting. When looking down into yours, I see six sitting comfortably; mine holds four comfortably. Is yours a different model?
Hi Addie,
We have the 3-Quart Instant Pot Mini Duo Plus. I’m not familiar with the different IP options but I think the Plus comes with an EGG preset while the standard duo may not?
Either way, I’d think ours should be the same in terms of capacity since they’re both 3-quarts. Maybe your eggs are larger than mine?
I just grabbed a couple of eggs from the carton in my fridge and weighed them. They’re store-bought large eggs. The average weight for one egg is about 2 ounces or 56 to 57 grams.
There is something well and trully off with those timings. Followed to the absolute letter, but all I got was soft runny eggs. And being as I’d obvioulsy let them cool, that meant they went in the trash, as eating cold soft boiled eggs is not my thing!
Hey Brando,
If what you meant to say was “Thanks for sharing a method that worked for you and providing detailed photos. I can see from the reviews it’s worked well for others in their 3 Quart Instant Pots but for some reason, my eggs came out runny. Can you help me figure out why?” let me know and I’d be happy to help you troubleshoot.
If not, there are 100’s of ways to cook eggs in an Instant Pot, I’m sure you’ll find one that works for you. As I said right before the recipe card, “For any method/time combination, I’d suggest cooking just one or two eggs the first time you try it.”
Best Wishes,
Brie
Bravo, Brie! Well said reply to a rude post. I’m sure others will agree.
Thanks for the support, Ryan 🙂
I know this was awhile ago, but for anyone reading now, I’m thinking this person was cooking either (1) in a larger Instant Potm; or (2) at a higher altitude; or (3) larger eggs than the tests in this post. I just made a batch with store-bought “large” eggs in the 3 quart IP Mini at 4250‘ altitude and they came out AWESOME. Not completely hard in the middle, but perfectly jammy. So fabulous! Thanks Brie!
Yay! I’m so glad it worked for you. Thanks for taking the time to share your insights and some of the factors that can affect how things cook in the Instant Pot, I really appreciate it. 🙂
Are these eggs right from the refrigerator? Did I miss it somewhere?
Hi Delores!
We use this recipe/method with cold straight-from-the-fridge eggs and with room temperature eggs. I haven’t noticed a difference between the cooked eggs but honestly, I haven’t been super focused on it either so you may find one type works better for you than another.
Thank you for walking us through that step by step! I’ve just unpacked my IP mini and, just like you, chose to start with hard-boiled eggs.
Is there a reason you don’t use the “Egg” program that is preset on the IP mini?
Thank you; I’m excited to read more if your posts.
Hi Kristen, congrats on your new toy 🙂
That’s a great question! With the exception of a few (like slow cook and saute), almost all of the presets are doing the same thing as the Pressure Cook button just with pressure levels and cooking times pre-programmed by Instant Pot. So you can use either one and then make changes to the time/pressure level as necessary.
My experience with the pre-sets on our toaster oven is that they rarely work how I’d like on the first time because it’s impossible to account for the different ingredients each person will be using. Example: in the manual it says the Egg preset time is intended for Extra Large Eggs.
Also, I found that using the Pressure Cook button to make our eggs helped us to get comfortable with the machine quickly. Since so many recipes are cooked using the Pressure Cook button that was a big priority for us.
A neat feature of the presets is that they remember your last used settings. After I got the time and pressure level dialed-in on our eggs I made a batch using the “Egg” button. Now I can just press that button (I call it my personalized preset, lol) and my eggs come out perfect.
Hope that helped. We’re working on more posts for the 3-quart, if there’s something you’d like to see let us know 🙂
Thanks for stopping!